There’s something truly special about the smell of chocolate baking in the oven, especially when it’s part of a fun, hands-on project. These chocolate cut out cookies have become my go-to recipe for any occasion that calls for a little bit of love and a lot of sprinkles. They are the perfect blend of a soft, chewy center and crisp, clean edges that hold their shape beautifully, making them an ideal canvas for decorating. Whether you’re planning some Easy Valentine Baking For Kids or just craving a rich, chocolatey treat, this recipe is wonderfully straightforward and forgiving.
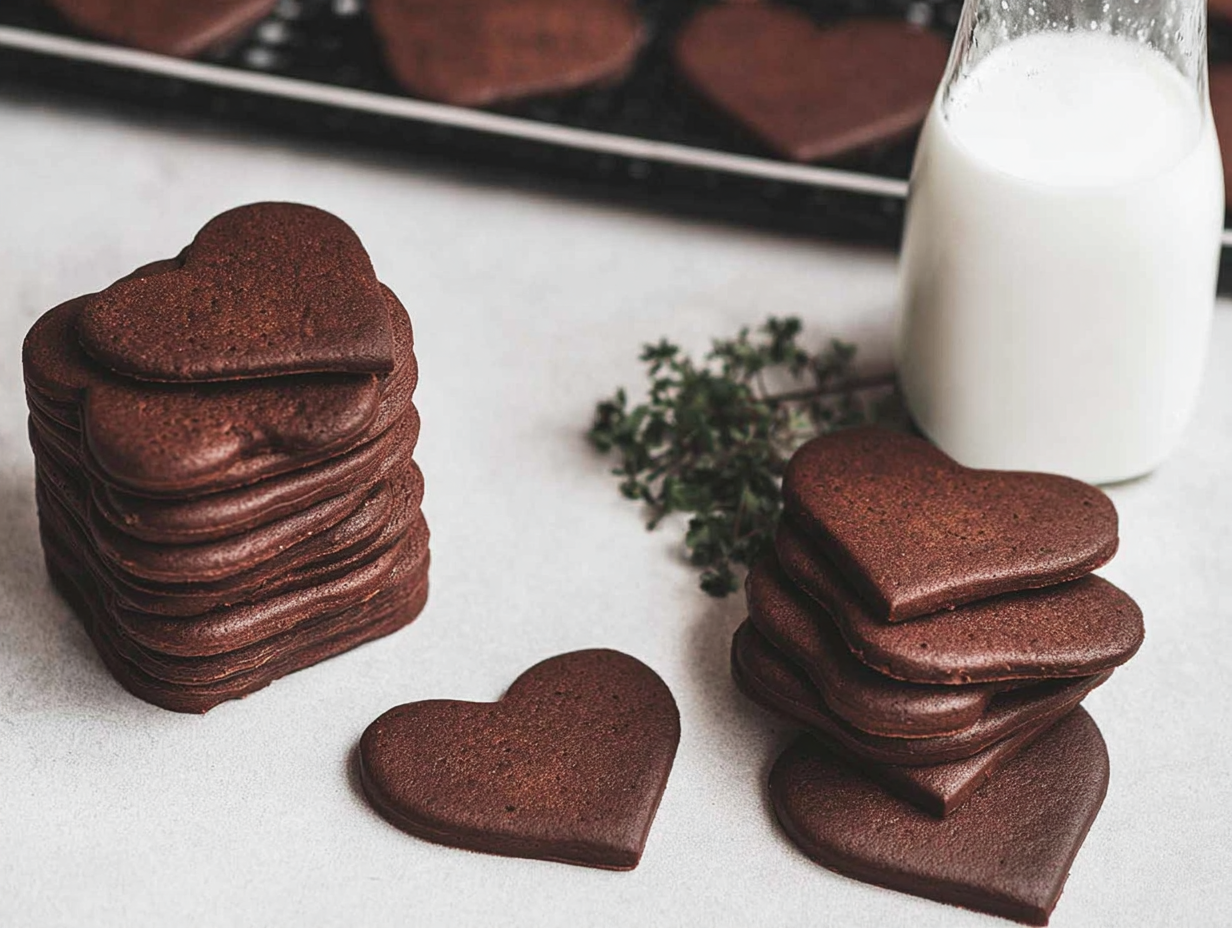
I first made these years ago when my little one wanted to make Heart Shaped Valentines Cookies for their classmates. I was tired of traditional sugar cookies that would spread into unrecognizable blobs in the oven. I needed something reliable. This recipe was born from that need—a chocolate cookie sturdy enough for little hands to handle and decorate, but with a deep, satisfying cocoa flavor that adults love too. It’s more than just a recipe; it’s a starting point for creating memories, a bit of Valentine’s Day Inspiration that you can taste. The dough comes together in minutes and, after a quick chill, is a dream to roll out. It’s the perfect way to spend an afternoon, with flour on your nose and a batch of soon-to-be-decorated cookies cooling on the counter.
Ingredients for Chocolate Cut Out Cookies
- 100 g (1/2 cup) unsalted butter, softened to room temperature
- 80 g (2/3 cup) powdered sugar
- 1 large egg, at room temperature
- 1 tsp vanilla extract
- 180 g (1 1/2 cups) all-purpose flour
- 25 g (1/4 cup) unsweetened cocoa powder
- 1 pinch of salt
- 1/2 tsp baking powder (this is optional, but helps with a slightly softer texture)
Step-by-Step Instructions to Make Chocolate Cut Out Cookies
- First things first, preheat your oven to 350°F (175°C). While it’s heating up, line one or two baking sheets with parchment paper. This prevents sticking and makes cleanup a breeze.
- In a large mixing bowl, either with a stand mixer or a hand mixer, cream the softened butter and powdered sugar together until the mixture is light and fluffy. This usually takes about 2-3 minutes. Don’t rush this step; it’s key to the cookie’s texture.
- In a separate, smaller bowl, sift or whisk together your dry ingredients: the all-purpose flour, unsweetened cocoa powder, salt, and optional baking powder. Sifting helps prevent lumps of cocoa powder in your final dough.
- Crack the room-temperature egg into the butter and sugar mixture, add the vanilla extract, and mix again until everything is just incorporated. Scrape down the sides of the bowl to make sure it’s all evenly combined.
- Now, add the dry ingredient mixture to the wet ingredients. Mix on the lowest speed until the dough just starts to come together. It will look a bit crumbly at first, then form a sticky, soft dough. Be careful not to overmix here, or the cookies can become tough.
- Use a spatula or a pastry scraper to gather the dough into a ball. Wrap it tightly in plastic wrap and gently flatten it into a disk shape. This makes it easier to roll out later.
- Let the dough chill in the refrigerator for at least 20-30 minutes. If you have more time, an hour is even better. This step is crucial for preventing the cookies from spreading too much.
- Once chilled, place the dough between two sheets of parchment paper and roll it out to about 1/8-inch thickness. For extra-sharp cuts, slide the whole thing (parchment and all) onto a baking sheet and pop it in the freezer for 10–15 minutes. This makes the dough firm and so much easier to cut.
- Peel off the top layer of parchment. Now for the fun part! Use your favorite cookie cutters to cut out shapes. These make perfect Easy Heart Cookies for Valentine’s Day. Carefully place the shapes on your prepared baking sheets, leaving a little space between them.
- Bake in your preheated oven for 8–10 minutes. The edges should look firm and set, but the centers will still be slightly soft. They’ll firm up as they cool.
- Let the cookies cool on the baking sheet for about 5 minutes before moving them to a wire rack to cool completely. They must be totally cool before you even think about decorating!
Tips & Tricks for the Best Chocolate Cut Out Cookies
Getting those perfect, sharp-edged chocolate cut out cookies is easier than you think. The number one, non-negotiable tip is to respect the chill time. Chilling the dough after mixing and then again after rolling is the secret to preventing spread. When the cold butter hits the hot oven, it creates steam that helps lift the cookie slightly without letting it expand outwards. If your kitchen is warm, don’t be afraid to pop your cut-out shapes back in the freezer for 10 minutes right before they go into the oven. This little trick guarantees those crisp, clean lines you want for decorating, making them ideal for intricate designs or as Valentine Iced Cookies.
Another key to success is achieving a uniform thickness when you roll out the dough. If your cookies are all different thicknesses, they’ll bake unevenly. Some will be burnt while others are still raw in the middle. You can buy rolling pin guides that slip onto the ends of your pin, but a simpler trick is to just be mindful as you roll. Apply even pressure and rotate the dough occasionally to ensure you’re not creating thin spots. Aim for about 1/8th of an inch. This thickness provides the perfect balance—sturdy enough to handle, yet tender enough to eat. It’s a small detail that makes a huge difference, especially when you’re making Valentines Day Cookies For Kids and want every cookie to be a success.
Why did my cookies taste bitter?
If your chocolate cookies have a bitter aftertaste, the culprit is almost always the cocoa powder. Make sure you are using a quality, unsweetened natural cocoa powder, not Dutch-processed, as the recipe’s acidity is balanced for it. Also, ensure your baking powder and salt are measured correctly, as they play a crucial role in balancing the deep, rich flavor of the chocolate. Overbaking can also contribute to a bitter taste, so pull them from the oven when the centers are still just a little soft.
Substitutions & Variations for Chocolate Cut Out Cookies
While this classic chocolate cut out cookie recipe is fantastic as is, it’s also a wonderful base for experimentation. One of my favorite simple additions is a teaspoon of instant espresso powder mixed in with the dry ingredients. It doesn’t make the cookies taste like coffee; instead, it deepens and intensifies the chocolate flavor, giving it a richer profile. For a different twist, you could add a half-teaspoon of peppermint extract along with the vanilla for a festive holiday cookie, or a pinch of cinnamon and cayenne for a Mexican hot chocolate-inspired treat. These small tweaks can transform your batch and offer some fun Valentine’s Day Inspiration beyond the standard heart shape.
When it comes to dietary needs, you have a few options. For a gluten-free version, you can typically swap the all-purpose flour with a good quality 1-to-1 gluten-free baking flour blend (one that contains xanthan gum). The texture may be slightly more delicate, so handle the dough with a bit of extra care. Unfortunately, this recipe relies heavily on butter and egg for its structure, so vegan substitutions are trickier and would require more significant adjustments. The real fun comes with decoration. Beyond royal icing, you can dip these in melted white, milk, or dark chocolate, or simply cover them in sprinkles before baking for a fuss-free, Cute Valentine Desserts look that kids will absolutely love.
What are some different types of sugar cookies I can make?
While this recipe is for a chocolate version, the world of cut-out cookies is vast! The classic is a vanilla sugar cookie, but you can also create lemon, almond, or funfetti variations by adding different extracts and mix-ins. For a completely different texture, you could try a shortbread cut-out cookie, which is much butterier and crumblier. Each type offers a unique canvas for your decorating ideas.
Frequently Asked Questions
Can I make the cookie dough ahead of time?
Absolutely! This dough is perfect for making ahead. You can prepare the dough, wrap it tightly in plastic wrap, and store it in the refrigerator for up to 3 days. When you’re ready to bake, you might need to let it sit on the counter for 10-15 minutes to become pliable enough to roll out. You can also freeze the dough disk for up to 3 months.
How do I store the finished chocolate cut out cookies?
Once the cookies are completely cooled (and any icing has fully set), store them in an airtight container at room temperature. They will stay fresh for up to a week. If you stack them, it’s a good idea to place a sheet of parchment paper between the layers to protect your decorations.
My dough is really sticky and hard to work with. What did I do wrong?
You didn’t do anything wrong! This dough is naturally soft and sticky before it’s chilled due to the high butter and low flour ratio, which is what makes the final cookie so tender. The refrigeration step is what makes it firm and manageable. If it’s still too soft after chilling, it might just need a little more time in the fridge. Don’t be tempted to add a lot more flour, as that will make the cookies dry and tough.
The Perfect Chocolate Cookie for Any Celebration
There you have it—a simple, reliable recipe for delicious chocolate cut out cookies that are as fun to make as they are to eat. I truly hope this becomes one of your go-to Valentines Treats Recipes for creating edible masterpieces with your loved ones. Seeing a platter of these beautifully decorated cookies is so rewarding, whether they’re elaborate creations or charmingly imperfect hearts made by little hands. So put on some music, get out your rolling pin, and enjoy the simple pleasure of baking something wonderful from scratch. Happy baking!
Chocolate Cut Out Cookies
Ingredients
Equipment
Method
- First things first, preheat your oven to 350°F (175°C). While it’s heating up, line one or two baking sheets with parchment paper. This prevents sticking and makes cleanup a breeze.
- In a large mixing bowl, either with a stand mixer or a hand mixer, cream the softened butter and powdered sugar together until the mixture is light and fluffy. This usually takes about 2-3 minutes. Don’t rush this step; it’s key to the cookie’s texture.
- In a separate, smaller bowl, sift or whisk together your dry ingredients: the all-purpose flour, unsweetened cocoa powder, salt, and optional baking powder. Sifting helps prevent lumps of cocoa powder in your final dough.
- Crack the room-temperature egg into the butter and sugar mixture, add the vanilla extract, and mix again until everything is just incorporated. Scrape down the sides of the bowl to make sure it’s all evenly combined.
- Now, add the dry ingredient mixture to the wet ingredients. Mix on the lowest speed until the dough just starts to come together. It will look a bit crumbly at first, then form a sticky, soft dough. Be careful not to overmix here, or the cookies can become tough.
- Use a spatula or a pastry scraper to gather the dough into a ball. Wrap it tightly in plastic wrap and gently flatten it into a disk shape. This makes it easier to roll out later.
- Let the dough chill in the refrigerator for at least 20-30 minutes. If you have more time, an hour is even better. This step is crucial for preventing the cookies from spreading too much.
- Once chilled, place the dough between two sheets of parchment paper and roll it out to about 1/8-inch thickness. For extra-sharp cuts, slide the whole thing (parchment and all) onto a baking sheet and pop it in the freezer for 10–15 minutes. This makes the dough firm and so much easier to cut.
- Peel off the top layer of parchment. Now for the fun part! Use your favorite cookie cutters to cut out shapes. These make perfect Easy Heart Cookies for Valentine’s Day. Carefully place the shapes on your prepared baking sheets, leaving a little space between them.
- Bake in your preheated oven for 8–10 minutes. The edges should look firm and set, but the centers will still be slightly soft. They’ll firm up as they cool.
- Let the cookies cool on the baking sheet for about 5 minutes before moving them to a wire rack to cool completely. They must be totally cool before you even think about decorating!