There’s something incredibly comforting about a classic cookie, the kind that fills your kitchen with the warm scent of butter and sugar. These raspberry shortbread thumbprint cookies are exactly that—a timeless treat that feels both special and wonderfully simple. They have a melt-in-your-mouth, buttery shortbread base that’s rich and tender, cradling a bright, sweet jewel of raspberry jam. It’s a recipe I come back to again and again, whether I’m looking for the perfect **Christmas cookies** to add to a holiday platter or a simple, elegant dessert to share with someone special. The beauty of this recipe is its simplicity; with just a handful of basic ingredients, you can create something truly delicious.
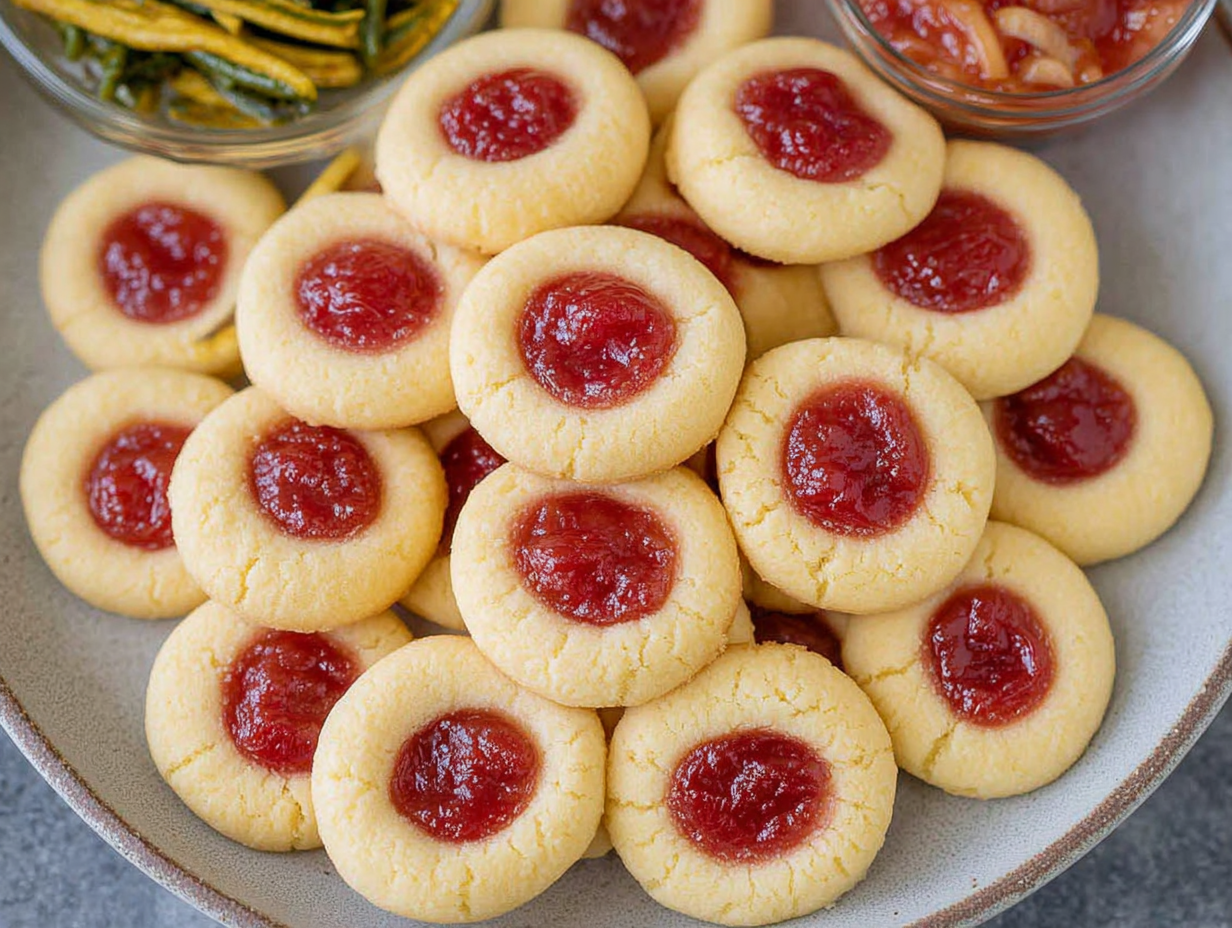
What I love most about these cookies is how personal they feel. The little thumbprint in the center is a mark of the baker, a sign that they were made with care. They’re rustic and charming, never perfectly uniform, which is part of their appeal. They are incredibly versatile, too. While they shine during the holidays, they are also perfect as sweet little cookies for Valentine’s day, a welcome addition to a bake sale, or just a delightful companion to a cup of tea on a quiet afternoon. The contrast between the crumbly, rich cookie and the slightly tart jam is just perfect. This recipe is straightforward and forgiving, making it a wonderful choice for bakers of all skill levels. It’s more than just a recipe; it’s a little piece of joy you can create and share.
Ingredients for Raspberry Shortbread Thumbprint Cookies
- ¾ cup salted butter, softened to room temperature
- ½ cup granulated white sugar
- 1 large egg yolk
- 1½ cups all-purpose flour
- ½ cup seedless raspberry jam
How to Make Raspberry Shortbread Thumbprint Cookies
- Prepare Your Station: First things first, preheat your oven to 350°F (175°C). Line a large baking sheet with parchment paper to prevent sticking and make cleanup a breeze.
- Cream Butter and Sugar: In a large mixing bowl, using either a stand mixer or a hand mixer, beat the softened butter and granulated sugar together on medium speed until the mixture is light, fluffy, and pale in color. This usually takes about 2-3 minutes. Scrape down the sides of the bowl to make sure everything is incorporated. Add the egg yolk and beat until it’s just combined.
- Add the Flour: Turn the mixer down to its lowest speed and gradually add the all-purpose flour. Mix only until the flour is just incorporated and a soft dough forms. Be careful not to overmix, as this can make the shortbread tough.
- Chill the Dough (Recommended): This step is optional, but I highly recommend it. Wrap the dough in plastic wrap and chill it in the refrigerator for at least an hour. Chilling solidifies the butter, which helps prevent the cookies from spreading too much in the oven, ensuring a thicker, more tender cookie.
- Portion the Dough: Once chilled, use a small cookie scoop or a spoon to portion the dough into balls about ½ tablespoon in size. Roll them gently between your palms to smooth them out and arrange them about 2 inches apart on your prepared baking sheet.
- Make the Indent: Now for the fun part! Gently press your thumb into the center of each dough ball to create a small well. Alternatively, the back of a ½ teaspoon measuring spoon works perfectly for a uniform look. A little light grease on the spoon can prevent sticking.
- Fill with Jam: Carefully fill each indent with raspberry jam. My favorite trick is to spoon the jam into a small zip-top bag, snip a tiny corner off, and pipe it neatly into the wells. It’s so much cleaner and easier than using a spoon.
- Bake to Perfection: Bake the raspberry cookies for 9-11 minutes. You’re looking for the edges to be a very light golden brown. The centers will still look soft.
- Cool Completely: Let the cookies cool on the baking sheet for a couple of minutes to set up before transferring them to a wire rack to cool completely. They are delicate when warm!
Tips & Tricks for the Best Shortbread Thumbprint Cookies
Over the years, I’ve learned a few things that take these shortbread thumbprint cookies from good to absolutely irresistible. The most important secret lies in the butter. It must be softened to room temperature, but not at all melted. If it’s too cold, it won’t cream properly with the sugar; if it’s too warm or melted, the cookies will spread into thin, greasy crisps. You should be able to press your finger into it and make an indent easily, but it should still hold its shape. Creaming it thoroughly with the sugar incorporates air, which is what gives the cookies their light, crumbly texture. It’s a small detail that makes a world of difference in the final product.
Another non-negotiable tip for me is chilling the dough. I know, I know—it’s tempting to skip this step when you want cookies right away. But that hour in the fridge is what keeps your beautiful little dough balls from melting into flat discs in the oven. It allows the butter to firm up, ensuring the cookies bake up thick and tender. This also gives the flour time to hydrate, which can even lead to a more flavorful cookie. To make the best raspberry thumbprint cookies, ensure your butter is softened but not melted. Cream it thoroughly with the sugar, but be careful not to overmix the flour. Chilling the dough for at least an hour is crucial to prevent spreading and ensure a tender, crumbly texture.
Uniform Size for Even Baking
For cookies that bake evenly, try to make your dough balls as uniform in size as possible. A small cookie scoop is your best friend here! It portions the dough quickly and consistently, ensuring that no cookies are left underbaked while others get too brown. If you don’t have one, a simple tablespoon measure will do the trick. Consistent sizing means every single cookie on the sheet will have that perfect light golden edge and soft center.
Substitutions & Variations
While the classic raspberry version is a favorite, this recipe is a fantastic canvas for other flavors. Feel free to get creative with the fillings and the dough itself. These cookies are wonderful for adapting to what you have on hand or for creating a diverse platter of treats for an event.
- Try Different Jams: Don’t have raspberry jam? No problem. Apricot, strawberry, blackberry, or even a citrusy lemon curd would be absolutely delicious. Seedless varieties tend to work best for a smoother filling.
- Add Extracts: A half teaspoon of vanilla extract or a quarter teaspoon of almond extract added to the dough along with the egg yolk can add another layer of flavor that complements the jam beautifully.
- Roll in Nuts: For extra texture and nutty flavor, roll the dough balls in finely chopped pecans, walnuts, or almonds before making the thumbprint indent. This is an especially lovely touch for Christmas cookies.
- Add a Glaze: Once the cookies have cooled completely, you can drizzle them with a simple glaze made from powdered sugar, a splash of milk, and a drop of vanilla. It makes them look extra special and adds a touch more sweetness.
Frequently Asked Questions
Why did my thumbprint cookies spread and go flat?
This is the most common issue, and it almost always comes down to two things: the temperature of the butter or skipping the chilling time. If your butter was too soft or melted when you mixed the dough, the cookies are destined to spread. Also, chilling the dough for at least an hour is crucial to help the butter firm up, which prevents the cookies from melting too quickly in the oven.
Can I make the cookie dough ahead of time?
Absolutely! This dough is perfect for making ahead. You can prepare the dough, wrap it tightly in plastic wrap, and store it in the refrigerator for up to three days. You can also freeze the dough for up to three months. Let it thaw in the fridge before portioning and baking.
How do I store raspberry thumbprint cookies?
Once the cookies have cooled completely, store them in an airtight container at room temperature. They will stay fresh and delicious for up to five days. I don’t recommend refrigerating them, as it can dry out the shortbread base.
Conclusion
There you have it—a simple, heartfelt recipe for classic raspberry shortbread thumbprint cookies. I hope you find as much joy in baking and sharing these little treats as I do. They are a testament to the fact that you don’t need complicated ingredients or techniques to create something truly memorable and delicious. Whether you’re baking for a holiday, a special someone, or just for yourself, these cookies are a perfect choice. They are more than just a dessert; they are a small act of love, a warm memory in the making, and a perfect sweet bite for any occasion, especially as cookies for Valentine’s Day.
Raspberry Shortbread Thumbprint Cookies
Ingredients
Equipment
Method
- Prepare Your Station: First things first, preheat your oven to 350°F (175°C). Line a large baking sheet with parchment paper to prevent sticking and make cleanup a breeze.
- Cream Butter and Sugar: In a large mixing bowl, using either a stand mixer or a hand mixer, beat the softened butter and granulated sugar together on medium speed until the mixture is light, fluffy, and pale in color. This usually takes about 2-3 minutes. Scrape down the sides of the bowl to make sure everything is incorporated. Add the egg yolk and beat until it’s just combined.
- Add the Flour: Turn the mixer down to its lowest speed and gradually add the all-purpose flour. Mix only until the flour is just incorporated and a soft dough forms. Be careful not to overmix, as this can make the shortbread tough.
- Chill the Dough (Recommended): This step is optional, but I highly recommend it. Wrap the dough in plastic wrap and chill it in the refrigerator for at least an hour. Chilling solidifies the butter, which helps prevent the cookies from spreading too much in the oven, ensuring a thicker, more tender cookie.
- Portion the Dough: Once chilled, use a small cookie scoop or a spoon to portion the dough into balls about ½ tablespoon in size. Roll them gently between your palms to smooth them out and arrange them about 2 inches apart on your prepared baking sheet.
- Make the Indent: Now for the fun part! Gently press your thumb into the center of each dough ball to create a small well. Alternatively, the back of a ½ teaspoon measuring spoon works perfectly for a uniform look. A little light grease on the spoon can prevent sticking.
- Fill with Jam: Carefully fill each indent with raspberry jam. My favorite trick is to spoon the jam into a small zip-top bag, snip a tiny corner off, and pipe it neatly into the wells. It’s so much cleaner and easier than using a spoon.
- Bake to Perfection: Bake the raspberry cookies for 9-11 minutes. You’re looking for the edges to be a very light golden brown. The centers will still look soft.
- Cool Completely: Let the cookies cool on the baking sheet for a couple of minutes to set up before transferring them to a wire rack to cool completely. They are delicate when warm!