There’s a certain kind of beautiful chaos that comes with hosting a get-together. Whether it’s the roar of the TV on game day or the happy chatter of a family potluck, you need food that’s easy to make, easy to serve, and disappears from the tray. For years, I struggled to find that perfect dish. I tried complex appetizers that kept me in the kitchen and crockpot recipes that felt a bit too heavy. Then, I discovered the magic of these Hot Italian Sub Sliders. This recipe isn’t just about feeding a crowd; it’s about creating a moment of pure, savory satisfaction that everyone can grab and enjoy without missing a beat. It’s the ultimate answer for delicious and easy Gameday Lunch Ideas.
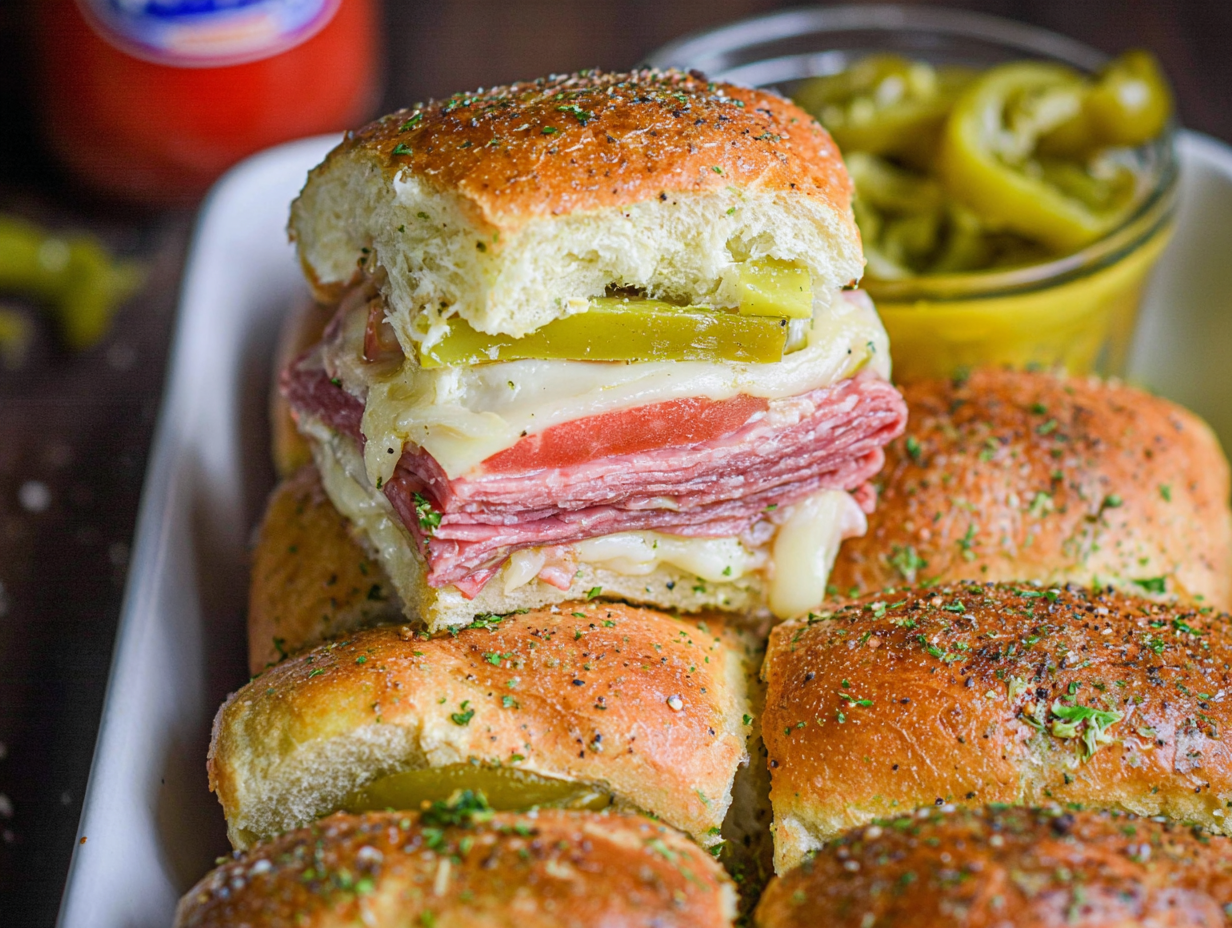
These sliders are everything you love about a classic Italian sub, transformed into a warm, gooey, shareable masterpiece. We’re talking layers of savory ham, spicy salami, and classic pepperoni, all tucked under a blanket of melted provolone cheese. But the real secret is the tangy kick from pepperoncini and hot cherry peppers, balanced by a garlic butter glaze that soaks into the sweet Hawaiian rolls. It’s the kind of recipe that makes your kitchen smell incredible and becomes an instant staple for any Group Gathering Food Ideas. They are so simple to assemble, which means less time stressing over the menu and more time enjoying the company. This is more than just a snack; it’s the centerpiece of a perfect casual meal.
Ingredients for Hot Italian Sub Sliders
- 12 pack of sweet rolls: I always reach for Kings Hawaiian rolls because their sweetness is the perfect counterpoint to the salty meats, but any soft dinner roll that’s connected in a slab will work.
- 6 oz package of ham: Thinly sliced deli ham is perfect here.
- 5 oz package of salami: Genoa salami adds that classic Italian flavor.
- 5 oz package of pepperoni: Use the large, thin slices meant for sandwiches, not the tiny pizza ones.
- 9 slices provolone cheese: Provolone has a mild flavor and melts beautifully, but mozzarella or even Swiss would be delicious.
- 1/3 cup pepperoncini, sliced: These add a tangy, slightly spicy crunch. Make sure to drain them well!
- 1/3 cup pickled hot cherry peppers, sliced: For those who like a bit more heat. You can substitute with sweet cherry peppers for a milder version.
- 1/4 cup salted butter, melted: This is the base of our delicious topping.
- 1 tsp Italian seasoning: A simple way to add a blend of classic herbs.
- 2 cloves garlic, crushed: Please use fresh garlic! The flavor is so much more potent and authentic than the jarred kind. It makes a huge difference.
- 1 cup marinara sauce: For dipping. Use your favorite brand or a simple homemade version.
How to Make Hot Italian Sub Sliders
One of the best parts about this recipe is how quickly it comes together. It’s mostly a matter of layering, which is perfect for getting kids involved in the kitchen or for prepping ahead of a party. The key is to have all your ingredients laid out and ready to go before you start building the sliders. This assembly-line approach makes the process smooth and stress-free, which is exactly what you need when you’re preparing Food To Bring To Tailgate. Remember, the goal is to create even layers so that every single slider has the perfect ratio of meat, cheese, and toppings. Don’t rush the process; enjoy building these little flavor bombs. It’s a simple recipe, but a little care during assembly goes a long way in the final product.
- Prepare Your Pan and Oven: First things first, preheat your oven to 350 degrees F. This ensures the sliders cook evenly from the moment they go in. While it’s heating, grab a 9×13 inch baking sheet or pan. You don’t need to grease it, but lining it with parchment paper can make cleanup a breeze later on.
- Slice and Layer the Rolls: Take your slab of rolls and, using a long serrated bread knife, carefully slice them in half horizontally. You want a distinct top half and bottom half. Place the bottom slab into your prepared pan. Now for the fun part: start layering. Begin with the ham, arranging it to cover the rolls completely. Follow that with the salami, then the pepperoni. Place the provolone slices over the pepperoni, making sure they overlap slightly to create a solid cheese blanket. Finally, scatter the drained pepperoncini and hot cherry peppers evenly over the cheese.
- Add the Top and Butter Mixture: Place the top half of the rolls back on. In a small bowl, whisk together the melted butter, Italian seasoning, and freshly crushed garlic. Using a pastry brush, generously coat the tops of the rolls with this mixture. Don’t be shy! Make sure to get the butter into all the little crevices and let it drip down the sides. This is what creates that irresistible golden-brown, savory crust.
- Bake to Golden Perfection: Cover the pan loosely with aluminum foil. This is a crucial step—it traps the steam, helping the cheese get perfectly melty and the insides heat through without the tops burning. Bake for 20 minutes, then remove the foil and bake for another 10-15 minutes. You’ll know they’re done when the cheese is bubbly and the tops are beautifully golden brown. Let them rest for a few minutes before slicing along the lines of the rolls and serving warm with a side of marinara for dipping.
Tips & Tricks for the Best Hot Italian Sub Sliders
Over the years, I’ve made these sliders for countless gatherings, and I’ve picked up a few little tricks that take them from great to absolutely unforgettable. These aren’t complicated steps, just small details that make a big difference in the final texture and flavor. Think of it as the kind of advice you’d get from a friend who has made the recipe a dozen times. For example, ensuring your pickled peppers are well-drained might seem minor, but it’s the key to preventing a soggy bottom bun. These little nuggets of wisdom are what turn a good recipe into one of your go-to Slider Sunday Recipes. It’s about understanding the why behind the steps, which helps you cook with more confidence and get consistent, delicious results every single time you make them, whether it’s for your family or as Snacks For Overnight Guests.
Don’t Neglect the Nooks and Crannies
When you’re brushing on the garlic butter topping, be generous. This isn’t just for color; it’s a huge flavor component. The butter, garlic, and seasoning mixture will seep down into the bread, infusing every bite with savory goodness. Use a silicone pastry brush to guide the butter into the separations between each roll. Let it pool up a little! As the sliders bake, that butter will toast the bread and create a crispy, flavorful crust that is an amazing contrast to the soft, cheesy interior. Taking an extra 30 seconds on this step is probably the single most important thing you can do to elevate your sliders.
The Two-Stage Bake is Crucial
It can be tempting to just throw the sliders in the oven uncovered and hope for the best, but please don’t skip the foil! Baking them covered for the first 20 minutes allows the inside of the sliders to heat up and the cheese to melt completely without the tops getting too dark. The foil traps steam, essentially warming the sliders from the inside out. Removing the foil for the last 10-15 minutes is all about the finish—it allows the tops to get that perfect golden-brown color and a slight crispness. This two-stage method guarantees a perfectly cooked slider every time.
Q: Can I toast the buns before assembling?
A: Yes, you absolutely can! If you’re concerned about the bottom buns getting soft, you can place the bottom slab of rolls on the baking sheet and bake them for about 5 minutes at 350°F before layering on the ingredients. This creates a slightly firmer base that holds up well to the fillings.
Substitutions & Variations
The beauty of a recipe like this is its flexibility. The Italian sub combination is a classic for a reason, but you can absolutely use it as a template to fit your tastes or use up what you have in the fridge. Think of this as a starting point for your own creations. Swapping out meats and cheeses is the easiest way to put a new spin on things. This is also a great way to build out your menu with more Food Spread Ideas for a larger party—you could offer a tray of these classic Italian sliders next to a tray of turkey and swiss sliders for variety. Don’t be afraid to experiment with different flavor combinations. You might just stumble upon your new favorite version!
- Meat Swaps: Not a fan of one of the meats? No problem. You can easily substitute them. Try using spicy capicola instead of pepperoni for a different kind of heat, or swap the ham for thinly sliced turkey or roast beef for a completely different vibe. A “Philly Cheesesteak” version with roast beef, provolone, and sautéed onions and peppers is also fantastic.
- Cheese Choices: Provolone is classic, but this is a great place to play with cheese. Shredded mozzarella will give you an epic cheese pull. Sliced Swiss would pair wonderfully with ham or turkey. Even a spicy pepper jack could be used to amp up the heat.
- Pepper Variations: If you’re not into spicy foods, you can easily swap the hot cherry peppers for roasted red peppers or even sweet banana peppers for that tangy flavor without the burn. A thin layer of olive tapenade could also add a delicious, salty kick.
- Topping Twists: Get creative with the butter topping. Add a tablespoon of grated Parmesan cheese to the butter mixture for a nutty, cheesy crust. A pinch of red pepper flakes can also be added for extra warmth. For a fresher take, sprinkle some fresh parsley over the sliders right after they come out of the oven.
Frequently Asked Questions About Hot Italian Sub Sliders
What are the best rolls for these sliders?
While I highly recommend King’s Hawaiian rolls for their signature sweetness that complements the salty meats, any soft, pull-apart dinner rolls will work beautifully. Look for rolls that are sold in a connected “slab” as this makes assembly much easier. Potato rolls or classic white dinner rolls are also great options.
Can I prepare Hot Italian Sub Sliders in advance?
Yes, this is one of the best things about this recipe! You can assemble the sliders completely—layering the meats, cheeses, and peppers—and place them in your baking dish. Cover tightly with plastic wrap and refrigerate for up to 24 hours. When you’re ready to bake, just remove the plastic wrap, whip up the fresh garlic butter topping, brush it on, and bake as directed. It’s a huge time-saver for parties.
What are the best Sides To Make With Sliders?
These sliders are pretty hearty on their own, so simple sides work best. A big bowl of classic potato chips, a fresh green salad with a light vinaigrette, a creamy pasta salad, or a simple fruit platter are all fantastic choices that round out the meal without being too heavy.
How do I store and reheat leftovers?
If you happen to have any leftovers, store them in an airtight container in the refrigerator for up to 3 days. To reheat, I recommend avoiding the microwave as it can make the bread soggy. The best way is to place them on a baking sheet and warm them in a 350°F oven or an air fryer for 5-10 minutes until heated through and the tops have crisped up again.
The Perfect Sliders for Any Occasion
There you have it—a simple, crowd-pleasing recipe that’s packed with flavor and guaranteed to be a hit. These Hot Italian Sub Sliders have become one of my most requested dishes for a reason. They bridge the gap between a snack and a meal, making them incredibly versatile. They are one of my favorite Food Ideas For Potlucks because they travel well and are just as delicious at room temperature as they are fresh from the oven. I hope you give this recipe a try for your next gathering. It’s more than just food; it’s a way to bring people together for a delicious, memorable bite. Enjoy!
Hot Italian Sub Sliders
Ingredients
Equipment
Method
- Preheat your oven to 350°F. Line a 9×13 inch baking pan with parchment paper for easy cleanup.
- Using a long serrated bread knife, slice the slab of rolls in half horizontally. Place the bottom slab into your prepared pan. Layer with ham, salami, pepperoni, and then the provolone cheese slices. Scatter the drained pepperoncini and hot cherry peppers evenly over the cheese.
- Place the top half of the rolls back on. In a small bowl, whisk together the melted butter, Italian seasoning, and crushed garlic. Generously brush this mixture over the tops of the rolls, allowing it to get into the crevices.
- Cover the pan loosely with aluminum foil and bake for 20 minutes. Remove the foil and bake for another 10-15 minutes, or until the cheese is bubbly and the tops are golden brown. Let rest for a few minutes before slicing and serving warm with marinara sauce for dipping.