There are some recipes that feel like more than just food; they’re a feeling, a memory, a way to pour love into something tangible. This Mother’s Day Pink Velvet Cake is exactly that. I remember the first time I decided to bake something truly special for my own mom. I was tired of the usual store-bought gifts and wanted to create something with my own hands. The kitchen was a mess of flour and sugar, but the smile on her face when she saw the beautiful pink cake was worth every bit of the cleanup. This isn’t just another Pink Cake Recipe; it’s a celebration on a plate, perfect for showing the incredible women in our lives how much they mean to us. It’s one of those standout Desserts To Try that becomes a family tradition.
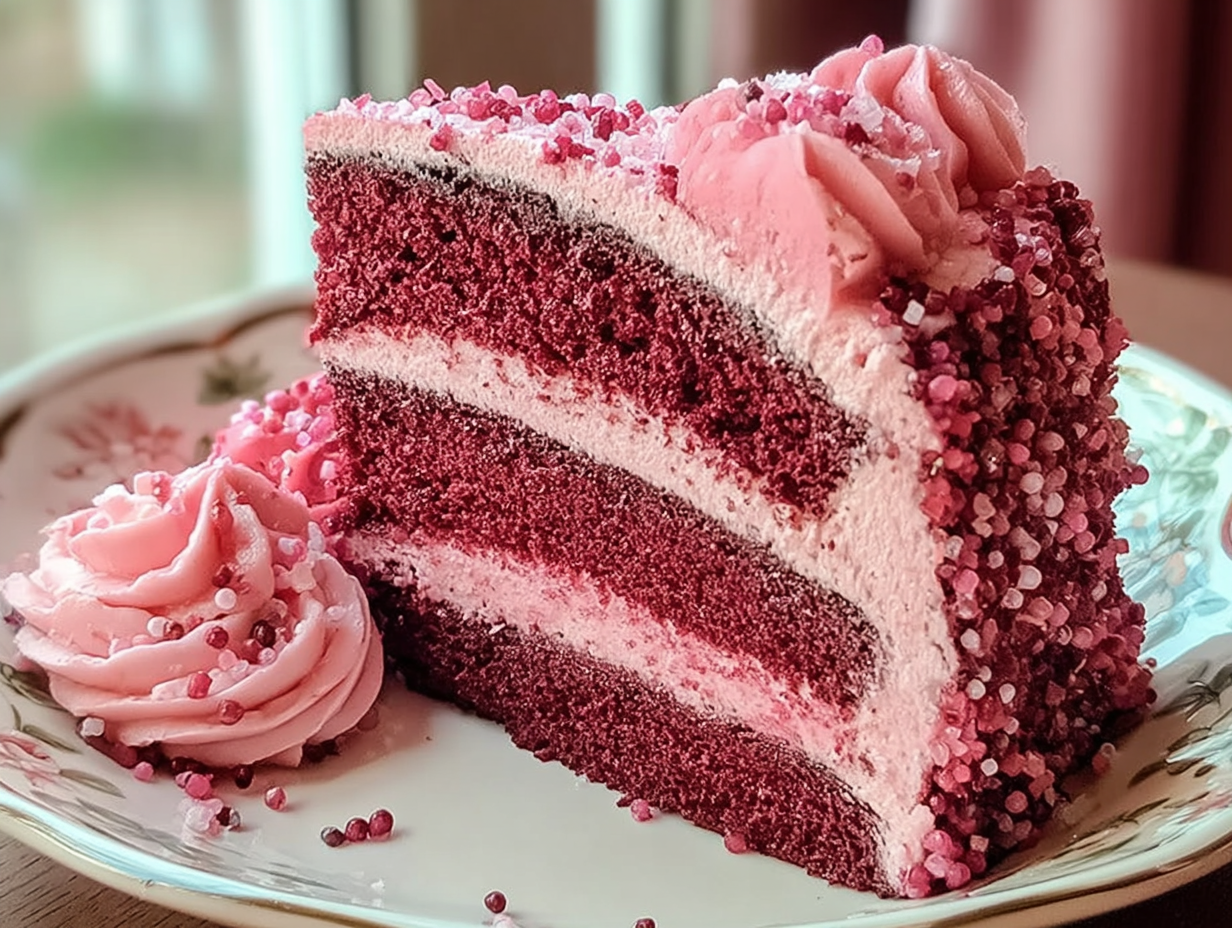
What makes this Pink Velvet Cake so enchanting is its subtle complexity and stunning looks. Unlike its classic red velvet cousin, this version has a gentler flavor profile, with just a whisper of cocoa powder to complement the rich vanilla notes. The texture is what truly sets it apart—it’s incredibly soft, moist, and tender, thanks to the cake flour and buttermilk. This isn’t a dense, heavy cake; it’s light and airy, melting in your mouth with each bite. The vibrant color makes it a showstopper, ideal for Mother’s Day, a Birthday Cake Valentines Day celebration, or any time you need a little beauty in your life. It’s one of those Fun Cakes To Make that looks impressive but is secretly straightforward, making it one of my favorite Pink Baking Ideas to share.
Pink Velvet Cake Ingredients
- 2 ½ cups cake flour
- 1 ¾ cups granulated sugar
- ½ cup unsweetened cocoa powder
- 1 tbsp baking powder
- ½ tsp salt
- ¾ cup unsalted butter, softened
- 4 large eggs, at room temperature
- 1 cup buttermilk, at room temperature
- 2 tsp pure vanilla extract
- Red or pink food coloring (to achieve desired hue)
- Cream cheese frosting (for topping)
Step-by-Step Instructions to Bake
- First things first, let’s get the oven ready. Preheat it to 350°F (175°C). Take two 9-inch round cake pans, grease them thoroughly with butter or baking spray, and I highly recommend lining the bottoms with parchment paper. This little step is a lifesaver and guarantees your cakes will release perfectly later on.
- In a medium-sized bowl, you’ll combine your dry ingredients. Whisk together the cake flour, unsweetened cocoa powder, baking powder, and salt. Whisking helps to aerate the flour and distribute everything evenly, which is a small step that contributes to a finer crumb in your finished cake. Set this bowl aside for now.
- Now for the heart of the batter. In a large mixing bowl, either with a stand mixer or a hand mixer, cream the softened butter and granulated sugar together. You’ll want to beat them on medium-high speed for about 3-5 minutes. The goal is to get the mixture really light, fluffy, and pale in color. This process incorporates air, which is essential for a light cake.
- With the mixer on low, add your room-temperature eggs one at a time. Make sure each egg is fully incorporated before adding the next one. This prevents the batter from splitting and helps create a stable emulsion. Scrape down the sides of the bowl as needed to ensure everything is mixed in.
- Next, in a separate small bowl or measuring cup, stir together the buttermilk, pure vanilla extract, and a few drops of red or pink food coloring. Add just enough coloring to get a vibrant pink you’re happy with—you can always add more, but you can’t take it away!
- Time to bring it all together. Alternate adding the dry ingredient mixture and the wet buttermilk mixture to your creamed butter and sugar. Start and end with the dry ingredients (I usually do this in three additions of dry and two of wet). Mix on low speed only until the last streaks of flour disappear. Overmixing is the enemy of tender Velvet Cakes!
- Carefully divide the beautiful pink batter evenly between your two prepared cake pans. Use a spatula to smooth the tops. Bake for 25-30 minutes. You’ll know they’re done when a wooden toothpick or cake tester inserted into the center comes out clean.
- Let the cakes cool in their pans on a wire rack for about ten minutes. This allows them to set up a bit before you handle them. After ten minutes, carefully invert the cakes onto the wire racks, peel off the parchment paper, and let them cool completely to room temperature before you even think about frosting. A warm cake and frosting are a recipe for disaster!
Tips & Tricks for the Perfect Pink Velvet Cake
Baking a cake from scratch can feel intimidating, but a few key details can make all the difference between a good cake and a great one. The most important tip I can give for this Pink Cake Recipe is to use room temperature ingredients. Seriously. The softened butter, eggs, and buttermilk should all be sitting out on your counter for at least 30-60 minutes before you begin. When these ingredients are at the same temperature, they form a smoother, more stable emulsion. This traps air in the batter, and that trapped air expands in the oven, resulting in a wonderfully light and fluffy cake. If your ingredients are cold, the butter can re-harden and cause the batter to look curdled or separated. It’s a simple step that has a massive impact on the final texture, ensuring your cake is tender rather than dense.
Another area where home bakers sometimes stumble is the mixing process. It’s so tempting to keep mixing until the batter is perfectly silky smooth, but this is where you can go wrong. Overmixing the batter after you’ve added the flour develops the gluten in the flour, which is great for chewy bread but terrible for a tender cake. This is what leads to a tough, dense, or rubbery crumb. To avoid this, mix on the lowest speed possible when you combine the wet and dry ingredients, and stop the moment you no longer see streaks of flour. A few small lumps are perfectly fine! Trust the process. This gentle handling preserves the airy texture you created when creaming the butter and sugar, making for one of the most delightful Types Of Cakes Flavors Recipes you can make at home.
Why is it important to use cake flour?
Cake flour has a lower protein content than all-purpose flour, which means it develops less gluten when mixed. This is the secret to achieving an exceptionally soft, fine, and tender crumb that is characteristic of high-quality bakery cakes and delicate Velvet Cakes. While you can substitute with all-purpose flour in a pinch, the texture will be noticeably denser and less delicate. For a true velvet texture that melts in your mouth, investing in a box of cake flour is absolutely worth it.
Substitutions and Variations
One of the best things about a classic recipe like this is how easily it can be adapted. If you need to make this cake gluten-free, you can have great success by swapping the cake flour for a high-quality measure-for-measure gluten-free flour blend that contains xanthan gum. For a dairy-free version, use your favorite plant-based butter substitute and create a “mock” buttermilk by mixing one cup of unsweetened almond or soy milk with one tablespoon of lemon juice or white vinegar. Let it sit for 5-10 minutes to curdle before using. These simple swaps make it possible to share these beautiful Pink and Red Desserts with friends and family who have dietary restrictions, ensuring no one misses out on this delightful treat.
Beyond dietary needs, there are plenty of ways to play with the flavor profile. While the classic cocoa-vanilla is divine, you can introduce new dimensions of flavor with extracts. A half-teaspoon of almond extract can add a lovely, subtle nuttiness that pairs beautifully with the other flavors. For a more floral note, especially fitting for Mother’s Day, consider adding a teaspoon of rosewater to the batter along with the vanilla. You could also fold in a cup of white chocolate chips for added texture and sweetness. Don’t be afraid to experiment; baking should be about creating something you love. These little tweaks can turn a wonderful recipe into your own signature bake, making it one of those truly Fun Cakes To Make again and again.
Can I use a different frosting?
Absolutely! While cream cheese frosting is the traditional pairing for velvet cakes, it’s not the only option. A classic American buttercream would be delicious, as would a silky Swiss meringue buttercream if you prefer something less sweet. For a richer option, a white chocolate ganache whipped into a frosting would be incredibly decadent. Feel free to use your favorite frosting recipe to make this cake your own.
Pink Velvet Cake: Frequently Asked Questions
How is pink velvet different from red velvet?
The primary difference is the color! Both cakes share a similar base with buttermilk and a hint of cocoa. Traditionally, red velvet cake’s color was the result of a chemical reaction between non-dutched cocoa and acidic ingredients like buttermilk, though today it’s enhanced with red food coloring. Pink velvet is a modern variation that leans into a lighter, brighter color and often has a slightly more pronounced vanilla flavor with just a whisper of cocoa, making it a distinct and delicate Pink Pastry experience.
Can I make this Pink Velvet Cake ahead of time?
Yes, this cake is great for making ahead. You can bake the cake layers, let them cool completely, and then wrap them tightly in plastic wrap. They can be stored at room temperature for up to two days or frozen for up to a month. The frosting can also be made ahead and stored in an airtight container in the refrigerator. Just let it come to room temperature and give it a quick whip before frosting the cake.
What’s the best way to get that vibrant pink color?
For the most vibrant and consistent color, I recommend using gel food coloring instead of liquid. Gel coloring is much more concentrated, so you need less of it, and it won’t water down your batter. Start with a few drops, mix it in, and see how you like the shade. You can always add more to achieve your perfect pink.
A Sweet Conclusion to a Beautiful Bake
There is something incredibly rewarding about pulling two perfectly baked, beautifully pink cake layers from the oven. The process of making this Pink Velvet Cake, from creaming the butter and sugar to watching the batter come together, is a calming and joyful experience. When you frost it and see the final creation, it’s a moment of pure pride. This cake isn’t just about the delicious end result; it’s about the love and care that goes into every step. It’s a reminder that sometimes the best gifts are the ones we take the time to create ourselves, turning simple ingredients into a memorable celebration.
Whether you’re an experienced baker or trying your hand at one of your first Velvet Cakes, this recipe is for you. I encourage you to save it, share it, and make it for someone you love. This Pink Velvet Cake is more than just one of the best Desserts To Try; it’s a centerpiece for your celebrations and a foundation for sweet memories. I hope it brings as much joy to your kitchen and your family as it has to mine. Happy baking!
Mother’s Day Pink Velvet Cake
Ingredients
Equipment
Method
- Preheat oven to 350°F (175°C). Grease and line two 9-inch round cake pans with parchment paper.
- In a medium-sized bowl, whisk together the cake flour, unsweetened cocoa powder, baking powder, and salt. Set aside.
- In a large mixing bowl with a stand mixer or hand mixer, cream the softened butter and granulated sugar on medium-high speed for 3-5 minutes until light, fluffy, and pale.
- With the mixer on low, add the eggs one at a time, ensuring each is fully incorporated before adding the next. Scrape down the sides of the bowl as needed.
- In a separate small bowl, stir together the buttermilk, pure vanilla extract, and a few drops of red or pink food coloring to achieve a vibrant pink.
- Alternate adding the dry ingredient mixture and the wet buttermilk mixture to the creamed butter and sugar, starting and ending with the dry ingredients. Mix on low speed only until the last streaks of flour disappear.
- Divide the batter evenly between the two prepared cake pans and smooth the tops. Bake for 25-30 minutes, or until a toothpick inserted into the center comes out clean.
- Let the cakes cool in the pans on a wire rack for about ten minutes before inverting them onto the racks to cool completely before frosting.