There’s a special kind of magic that fills the kitchen during the holidays, a warmth that has little to do with the oven being on. It’s the feeling of creating something beautiful and delicious to share. For me, nothing captures that feeling quite like these Red Velvet Crinkle Cookies. Their brilliant red hue and snowy, cracked tops make them the star of any cookie platter. They’re the first ones to disappear at holiday parties, and the recipe everyone asks for. It’s more than just a cookie; it’s a little piece of festive joy, a soft, chewy bite of holiday cheer that I look forward to making every single year.
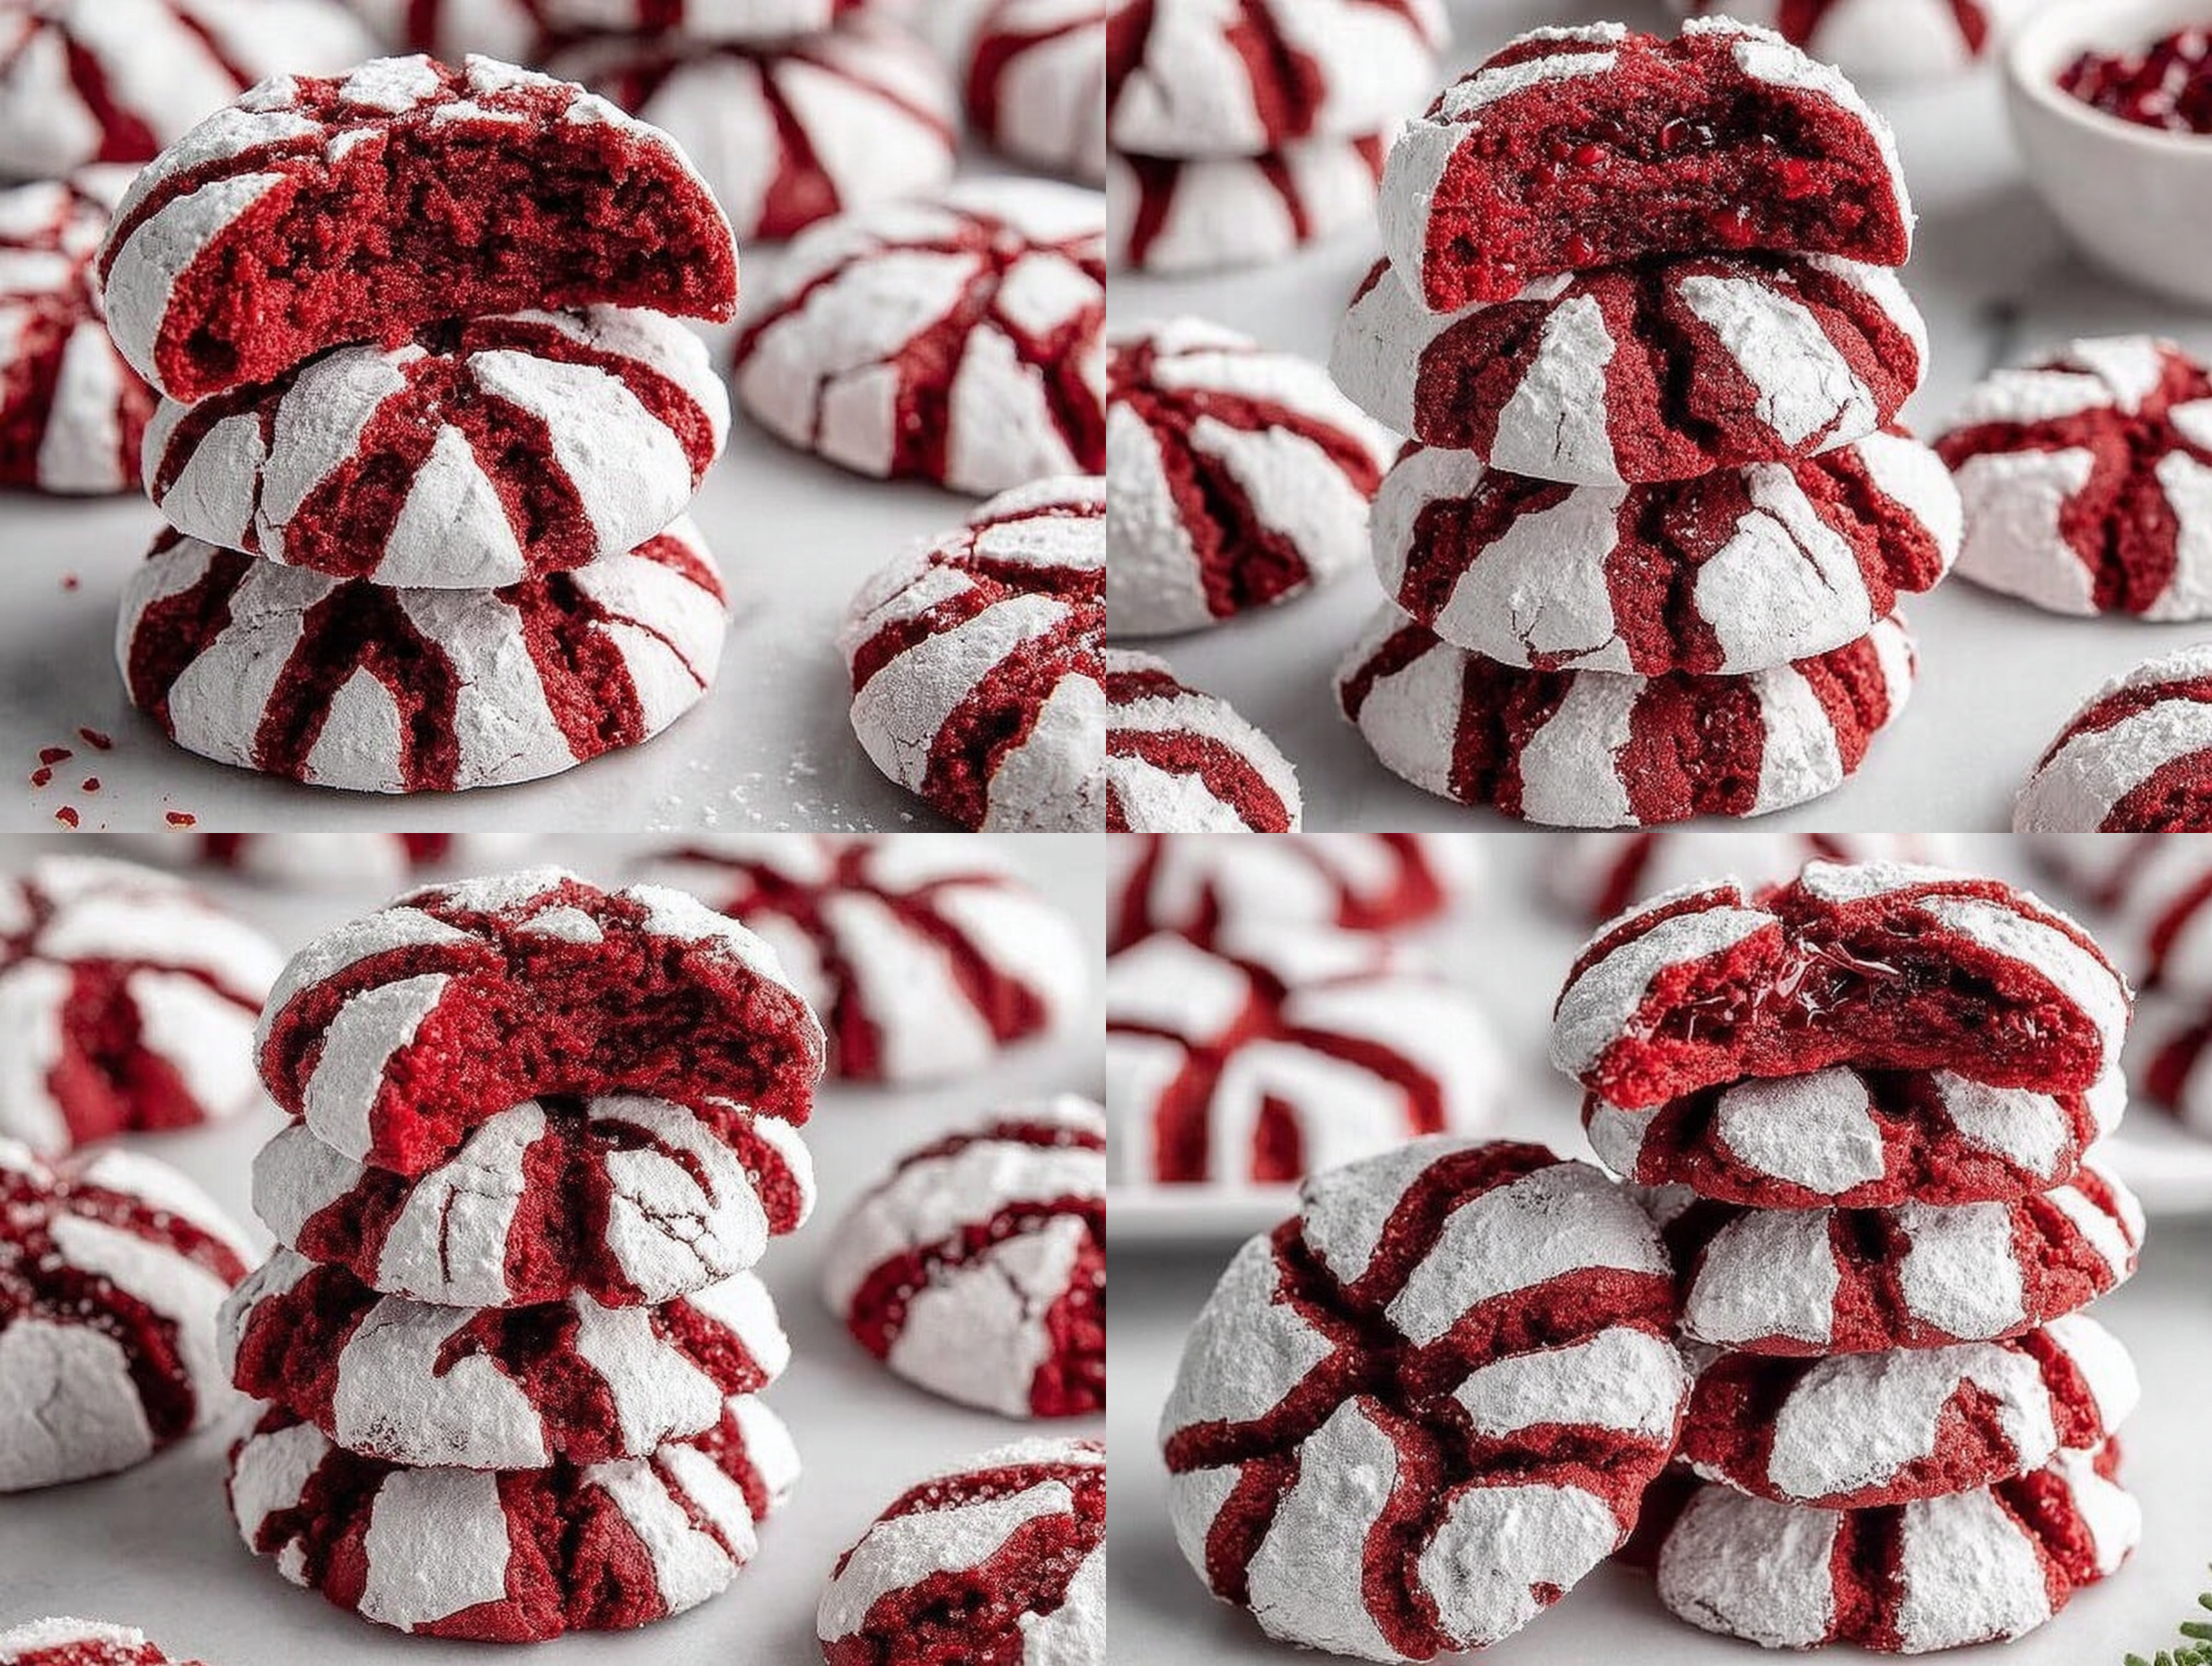
This recipe transforms the classic red velvet cake into a perfectly portable treat. What makes these Red Velvet Crinkle Cookies so special is their incredible texture—a delightfully soft, almost fudgy center with slightly crisp edges. The flavor is a delicate balance of mild cocoa and sweet vanilla, making them universally loved. They are one of my all-time favorite Christmas baked treats because they look so impressive, yet the process is surprisingly straightforward. These stunning red and white desserts are not just for Christmas; their romantic color makes them perfect for Valentine’s Day, too. This isn’t just another recipe; it’s a reliable, joy-sparking tradition you’ll want to adopt.
Ingredients for Red Velvet Crinkle Cookies
- 1 1/2 cups all-purpose flour
- 1/2 cup unsweetened cocoa powder
- 1 teaspoon baking powder
- 1/4 teaspoon salt
- 1/2 cup unsalted butter, softened to room temperature
- 1 cup granulated sugar
- 2 large eggs
- 1 teaspoon vanilla extract
- 1 tablespoon red food coloring (gel recommended for vibrant color)
- 1/2 cup powdered sugar, for rolling
Step-by-Step Instructions
- Prepare Your Station: First things first, let’s get the oven going. Preheat it to 350°F (175°C). While it’s heating up, line a couple of baking sheets with parchment paper. This little step prevents sticking and makes cleanup a breeze.
- Whisk the Dry Ingredients: In a medium-sized bowl, combine the all-purpose flour, unsweetened cocoa powder, baking powder, and salt. Whisk them together for about 30 seconds. This ensures everything is evenly distributed, which is key for a consistent cookie texture.
- Cream Butter and Sugar: In a separate, larger bowl, beat the softened butter and granulated sugar together with an electric mixer on medium speed. Let it go for a good 2-3 minutes. You’re looking for a light, almost fluffy texture. This process whips air into the mixture, which helps create a softer cookie.
- Add the Wet Ingredients: Add the eggs one at a time, making sure to beat well after each one before adding the next. This helps them incorporate fully. Now, stir in the vanilla extract and the red food coloring. Mix until you have a uniform, vibrant red batter.
- Combine Wet and Dry: Gradually pour the dry ingredient mixture into the wet ingredients. Mix on low speed or by hand with a spatula just until you no longer see any white streaks of flour. The dough will be quite soft and sticky at this point—don’t worry, that’s exactly how it should be!
- Chill the Dough: This step is crucial! Cover the bowl with plastic wrap and let the dough chill in the refrigerator for at least 30 minutes, or up to an hour. Chilling solidifies the butter, making the sticky dough much easier to handle and preventing the cookies from spreading too much in the oven.
- Form and Coat the Cookies: Pour the powdered sugar into a small, shallow bowl. Once the dough is chilled and firm, scoop out portions about a tablespoon in size and roll them between your palms to form 1-inch balls. Roll each ball generously in the powdered sugar until it’s completely covered in a thick white coat.
- Bake to Perfection: Arrange the sugar-coated dough balls on your prepared baking sheets, leaving about 2 inches of space between them for spreading. Bake for 10 to 12 minutes. The cookies are done when the edges are set, but the centers still look a little soft. The magical crinkles will appear as they bake!
- Cool Completely: Let the cookies cool on the baking sheets for about 5 minutes. This allows them to set up properly so they don’t fall apart. After 5 minutes, transfer them to a wire rack to finish cooling completely. This is one of those baking cookie recipes that smells as good as it tastes!
Tips & Tricks for the Best Red Velvet Crinkle Cookies
After making these cookies dozens of times, I’ve learned a few things that really take them from good to great. The most important tip is to not skip the chilling time. I know it’s tempting to rush, but a well-chilled dough is the secret to a thick, chewy cookie that doesn’t spread into a thin, crispy wafer. The cold dough melts slower in the oven, giving the cookies a chance to puff up and create that perfect soft center. This simple waiting period also allows the flavors to meld and deepen, giving you a more pronounced cocoa and vanilla taste. Trust me, patience pays off with this recipe, making these Red Velvet Treats Easy and foolproof.
Another key to success is the powdered sugar coating. Don’t be shy with it! A light dusting won’t give you those dramatic, high-contrast crinkles. You want to roll each dough ball until it has a thick, generous coating. Some bakers even suggest rolling the balls in granulated sugar first, then in powdered sugar, to help absorb any moisture from the dough and keep the white coating bright and distinct. Also, be mindful of your bake time. The goal is a soft, slightly fudgy center. Overbaking will lead to a dry, crumbly cookie. It’s better to pull them from the oven when they look just a tiny bit underdone in the middle; they’ll continue to set on the hot baking sheet.
Why didn’t my cookies crinkle?
This is a common question, and the answer usually lies in one of two areas: the dough or the sugar coating. If your dough is too warm or spreads too quickly, the surface won’t have time to dry and crack properly. This goes back to the importance of chilling the dough thoroughly. The other culprit is an insufficient coating of powdered sugar. As the cookie spreads, the surface needs a thick layer of sugar to crack and create those beautiful fissures. Make sure each dough ball is opaque white with sugar before it goes into the oven. A thick, dry coating is what gives you that signature crinkle effect.
Substitutions & Variations for Red Velvet Cookies
While the classic recipe is a true winner, it’s also incredibly fun to customize. One of the most popular variations is adding white chocolate chips. The creamy sweetness of white chocolate is a perfect complement to the subtle cocoa flavor of the red velvet. Simply fold in about a cup of white chocolate chips after you’ve combined the wet and dry ingredients. For a deeper chocolate flavor, you can add a teaspoon of espresso powder along with the dry ingredients. It won’t make the cookies taste like coffee; it will just enhance and enrich the cocoa notes, giving them a more complex, grown-up flavor profile that expands your list of Red Desserts Ideas.
If you need to make these cookies gluten-free, you can generally substitute the all-purpose flour with a good quality 1-to-1 gluten-free baking blend. Look for one that contains xanthan gum, as it helps provide the structure that gluten normally would. The texture might be slightly different, but they will still be delicious. For a different flavor twist, try swapping the vanilla extract for half a teaspoon of almond extract for a hint of cherry-like flavor that works wonderfully with the red velvet. These simple swaps can make the recipe feel brand new and cater to different tastes or dietary needs.
Frequently Asked Questions
Can I make the dough ahead of time?
Absolutely! This is one of the great things about this recipe. You can prepare the cookie dough, cover it tightly with plastic wrap, and refrigerate it for up to 3 days. When you’re ready to bake, just let it sit at room temperature for about 15-20 minutes to soften slightly, then scoop, roll, and bake as directed.
How do I get a truly vibrant red color?
For that signature deep red velvet color, I highly recommend using gel food coloring instead of liquid. Gel coloring is much more concentrated, so you can achieve a brilliant hue without adding excess liquid to the dough, which can alter the texture. A full tablespoon might seem like a lot, but it’s necessary to overcome the browning effect of the cocoa powder.
How should I store these cookies?
Store your cooled Red Velvet Crinkle Cookies in an airtight container at room temperature. They will stay soft and chewy for up to 5 days. If they start to harden, you can place a slice of bread in the container to help them soften up again.
A Perfect Treat for Any Occasion
There is something so satisfying about pulling a tray of these perfect Red Velvet Crinkle Cookies from the oven. The way the snowy tops crack to reveal the rich red cookie beneath is a little bit of baking magic every time. They are more than just a dessert; they are a conversation starter and a festive centerpiece. Whether you’re arranging them on a platter for a holiday gathering or packing them into a tin as a heartfelt gift, they always bring a smile. Their stunning appearance makes them ideal not only for Christmas but also as lovely Valentine’s Day Baked Treats. I hope you enjoy making—and sharing—this recipe as much as I do.
Red Velvet Crinkle Cookies
Ingredients
Equipment
Method
- Prepare Your Station: First things first, let’s get the oven going. Preheat it to 350°F (175°C). While it’s heating up, line a couple of baking sheets with parchment paper. This little step prevents sticking and makes cleanup a breeze.
- Whisk the Dry Ingredients: In a medium-sized bowl, combine the all-purpose flour, unsweetened cocoa powder, baking powder, and salt. Whisk them together for about 30 seconds. This ensures everything is evenly distributed, which is key for a consistent cookie texture.
- Cream Butter and Sugar: In a separate, larger bowl, beat the softened butter and granulated sugar together with an electric mixer on medium speed. Let it go for a good 2-3 minutes. You’re looking for a light, almost fluffy texture. This process whips air into the mixture, which helps create a softer cookie.
- Add the Wet Ingredients: Add the eggs one at a time, making sure to beat well after each one before adding the next. This helps them incorporate fully. Now, stir in the vanilla extract and the red food coloring. Mix until you have a uniform, vibrant red batter.
- Combine Wet and Dry: Gradually pour the dry ingredient mixture into the wet ingredients. Mix on low speed or by hand with a spatula just until you no longer see any white streaks of flour. The dough will be quite soft and sticky at this point—don’t worry, that’s exactly how it should be!
- Chill the Dough: This step is crucial! Cover the bowl with plastic wrap and let the dough chill in the refrigerator for at least 30 minutes, or up to an hour. Chilling solidifies the butter, making the sticky dough much easier to handle and preventing the cookies from spreading too much in the oven.
- Form and Coat the Cookies: Pour the powdered sugar into a small, shallow bowl. Once the dough is chilled and firm, scoop out portions about a tablespoon in size and roll them between your palms to form 1-inch balls. Roll each ball generously in the powdered sugar until it’s completely covered in a thick white coat.
- Bake to Perfection: Arrange the sugar-coated dough balls on your prepared baking sheets, leaving about 2 inches of space between them for spreading. Bake for 10 to 12 minutes. The cookies are done when the edges are set, but the centers still look a little soft. The magical crinkles will appear as they bake!
- Cool Completely: Let the cookies cool on the baking sheets for about 5 minutes. This allows them to set up properly so they don’t fall apart. After 5 minutes, transfer them to a wire rack to finish cooling completely. This is one of those baking cookie recipes that smells as good as it tastes!