There’s something so incredibly special about the treats behind the glass at a Starbucks counter, isn’t there? My kids’ eyes always go straight to those cheerful, pink Starbucks Cake Pops. They see a perfect little bite of birthday cake on a stick; I see a simple joy that can turn a regular Tuesday into a small celebration. For years, grabbing one was our little ritual, a sweet punctuation mark on a day of running errands. But I started to wonder if I could bring that specific joy into our own kitchen, making it a fun activity instead of just a purchase. This Starbucks Cake Pop Recipe is the result of that daydream – a way to capture that coffee-shop magic right at home, any time the craving strikes.
What I love most about this recipe is its simplicity. It’s a truly Cake Pop Recipe Easy enough for a weekend baking project with the kids, but the results are so impressive, they look like they came straight from the bakery case. We’re using a straightforward vanilla cake mix and a touch of frosting to create that iconic, fudgy interior that makes the Starbucks Cake so beloved. This isn’t just about saving a few dollars; it’s about the fun of creating something special together. It’s perfect for a Starbucks Birthday party theme, a bake sale, or just a sweet surprise in a lunchbox. Forget complicated steps and fancy ingredients; this is one of those Easy Baking Recipes Desserts that delivers pure happiness with minimal fuss. You get all the flavor and fun, plus a whole batch to share (or not!).
Ingredients for this Starbucks Cake Pop Recipe
- 1 box vanilla cake mix (plus ingredients listed on the box, like eggs, oil, and water)
- 1/3 cup French vanilla frosting
- 1 bag (12oz) light pink candy melts
- White nonpareils or sprinkles for decorating
- Lollipop sticks
How to Make Our Easy Starbucks Cake Pop Recipe
Making these copycat Birthday Cake Pops is a fun, multi-step process that’s worth every second. The key is to break it down and not rush the chilling times, as that’s what makes the cake pops firm and easy to handle. We’ll start by baking a simple cake, letting it cool, and then transforming it into the dense, sweet filling that everyone loves. Think of it as a fun project where you get to play with your food a little bit! Once you get the hang of crumbling the cake and mixing it with frosting, the rest feels like arts and crafts. Getting the right texture for the cake ball mixture is the most important part. It should be moist enough to hold its shape easily when you roll it, almost like play-doh, but not so sticky that it’s a mess to handle. This stage sets you up for success, ensuring your cake pops don’t fall apart during the dipping process. Remember, patience during the freezing steps is your best friend for a smooth, professional-looking finish.
- Bake the Cake: First things first, prepare and bake your vanilla cake mix according to the directions on the box. A 9×13-inch pan works perfectly for this. Let it cool completely on a wire rack. Don’t rush this step – a warm cake will turn into a greasy mush when you add the frosting.
- Crumble and Mix: Once the cake is totally cool, crumble it up into a large bowl. You can use your hands (the fun way!) or a fork until you have fine crumbs. Add the vanilla frosting and mix it all together until it’s well combined and has a thick, dough-like consistency.
- Roll and Chill: Use a small cookie scoop to portion out the mixture, then roll it between your hands to form tight, 1.5-inch balls. Place them on a baking sheet lined with parchment paper. Once you’ve rolled all the balls, pop the baking sheet into the freezer for at least 30-60 minutes until they are very firm. This is a crucial step for this Cake Pop Recipe Easy.
- Melt and Prep Sticks: While the cake balls are chilling, melt your pink candy melts. You can do this in the microwave in 30-second intervals, stirring in between, or in a double boiler. Once the candy is smooth, take your lollipop sticks and dip the tip of each one into the melted candy, then insert the stick about halfway into a frozen cake ball. This candy acts like glue! Place them back in the freezer for another 15 minutes to solidify.
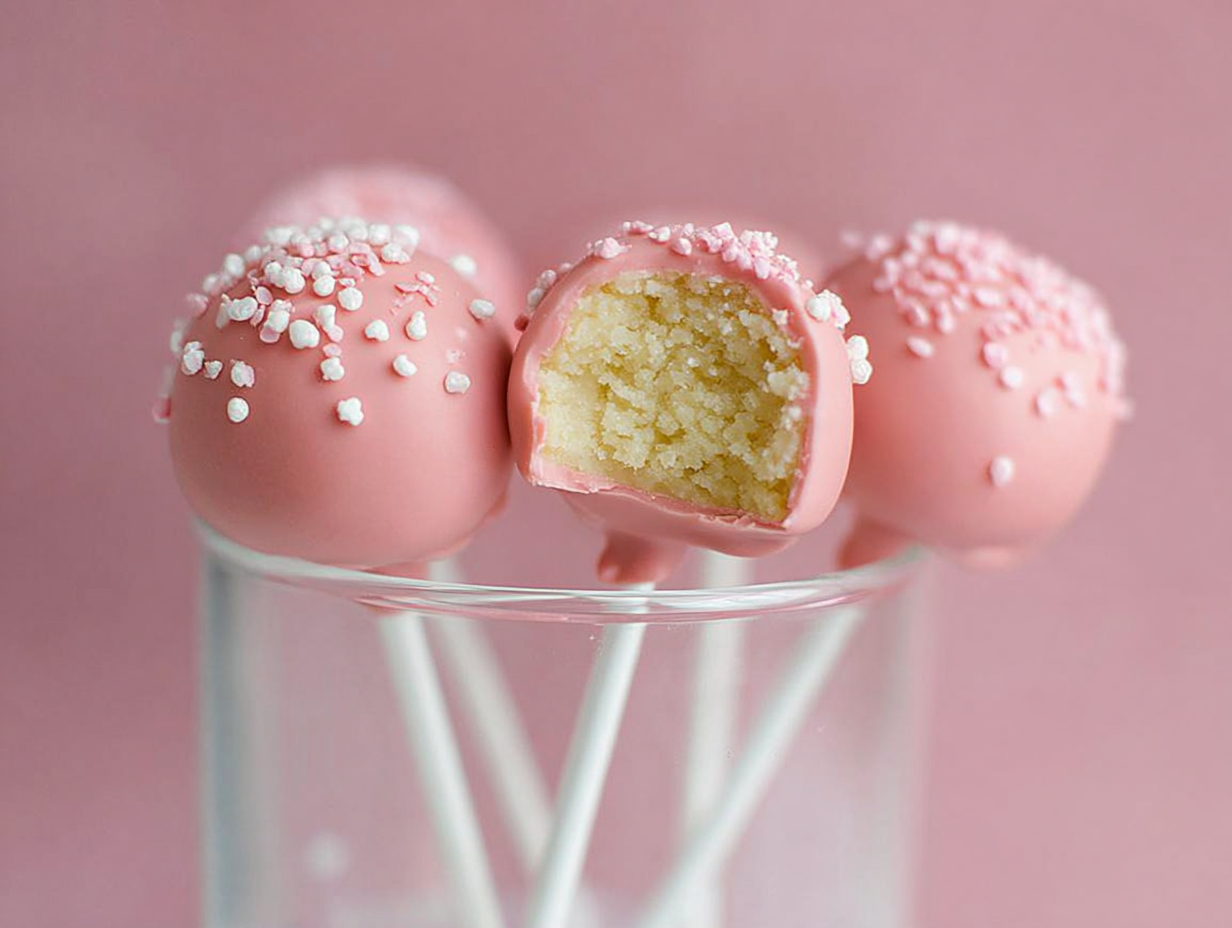
- Dip and Decorate: Now for the final touch! Hold the stick and dip each cake pop into the melted pink candy, turning it to coat it completely. Gently tap the stick on the side of the bowl to let any excess candy drip off. Before the coating sets, add your white sprinkles. Place the finished pops upright in a styrofoam block or a piece of cardboard with holes poked in it to dry completely.
Tips & Tricks for the Perfect Starbucks Cake Pops
Creating truly perfect Starbucks Cake Pops at home is all about mastering a few simple techniques. One of the biggest challenges people face is getting that flawlessly smooth candy coating. If your candy melts seem too thick for dipping, don’t be afraid to stir in a tiny bit of coconut oil or vegetable shortening (about half a teaspoon at a time) until it reaches a thinner, more fluid consistency. This makes it so much easier to get an even coat without clumping. Also, consider the vessel you’re using for dipping. A tall, narrow glass or mug is often much better than a wide bowl, as it allows you to submerge the cake pop in one clean motion rather than having to spoon the coating over it, which can create bumps and an uneven finish. These little adjustments can make a huge difference, transforming your homemade treats into professional-looking confections that are ready for any Starbucks Birthday celebration.
Why Are My Cake Pops Falling Apart?
This is the most common frustration, but it’s usually an easy fix! There are two main culprits. First, the cake ball might not be cold enough. The freezer is your best friend in this recipe. The balls need to be very firm, almost frozen solid, before you attempt to dip them in the warm candy coating. If they’re too soft, the weight of the coating will pull them right off the stick. The second reason is often skipping the “glue” step. Dipping the tip of the lollipop stick in a little melted candy before inserting it into the cake ball is non-negotiable. This creates a strong anchor that hardens in the freezer, securing the cake ball firmly to the stick. Following these chilling and anchoring steps will make your entire process much smoother and more successful, which is key for any Easy Baking Recipes Desserts.
Substitutions & Fun Variations
Once you’ve mastered the basic vanilla Starbucks Cake Pop Recipe, a whole world of delicious possibilities opens up. This recipe is incredibly versatile and serves as a fantastic base for all sorts of creative twists. Don’t feel locked into just one flavor profile; think of it as a template for your imagination. You can easily switch up the cake, frosting, and coatings to match holidays, party themes, or personal preferences. This is where you can move beyond a simple copycat and create signature treats that are uniquely yours. Exploring different Cake Pop Flavors is part of the fun, turning a simple baking project into a creative outlet. Whether you’re a chocolate lover, a fan of citrus, or want to create something truly decadent, the options are practically endless.
Exploring Different Cake Pop Flavors
- Chocolate Dream: Use a devil’s food cake mix with chocolate frosting. Dip in melted dark or milk chocolate candy melts and top with chocolate sprinkles.
- Red Velvet: A classic for a reason! Use a red velvet cake mix with cream cheese frosting for a tangy, rich flavor. Dip in white candy melts for a beautiful contrast.
- Lemon Drop: For a bright, zesty treat, use a lemon cake mix with lemon frosting. Dip in yellow or white candy melts and top with yellow sugar crystals.
- Dessert Oreo: This is a fan favorite! Use a chocolate cake mix and mix in finely crushed Oreo cookies along with vanilla frosting. Dip in white candy melts and sprinkle with more Oreo crumbs before it sets. This is one of the best Starbucks Recipes to customize.
Frequently Asked Questions
How do I store homemade cake pops?
Once your cake pops are fully set, you can store them in an airtight container. They will keep well in the refrigerator for up to a week. If you need to store them for longer, they also freeze beautifully. Just place them in a single layer in a freezer-safe container. They can be frozen for up to a month. When you’re ready to enjoy them, let them thaw in the refrigerator for a few hours.
Can I make these ahead of time?
Absolutely! This is a great recipe to make in stages. You can bake the cake, crumble it, and mix it with frosting a day or two in advance. Just keep the mixture covered tightly in the fridge. You can also roll the balls and keep them in the freezer for up to a week before you’re ready to dip and decorate them. This makes them perfect for party planning.
Why did my candy coating crack after drying?
Cracking is usually caused by a drastic temperature difference. If your cake balls are frozen solid and you dip them into candy coating that is quite warm, the rapid change in temperature as the cake ball expands slightly can cause the hardened shell to crack. To avoid this, try letting your frozen cake balls sit at room temperature for just 5-10 minutes before dipping. This slight temperature adjustment can prevent the dreaded cracking and give you a perfect finish.
Conclusion
There is such a satisfying feeling in recreating a beloved treat at home, and this Starbucks Cake Pop Recipe truly delivers on that promise. It transforms a simple box of cake mix into something special, a bite-sized piece of joy that brings smiles to everyone’s faces. Whether you stick to the classic vanilla for a true copycat experience or venture into new Cake Pop Flavors, the process is just as rewarding as the result. I hope this guide empowers you to bring that coffee shop magic into your own kitchen for your next Starbucks Birthday party or just as a fun weekend activity. It’s more than just a dessert; it’s a chance to create sweet memories, one delicious cake pop at a time. Happy baking!
Starbucks Cake Pop Recipe (Easy Copycat)
Ingredients
Equipment
Method
- Bake the Cake: Prepare and bake your vanilla cake mix according to the directions on the box in a 9×13-inch pan. Let it cool completely on a wire rack.
- Crumble and Mix: Once the cake is completely cool, crumble it into fine crumbs in a large bowl. Add the vanilla frosting and mix until it has a thick, dough-like consistency.
- Roll and Chill: Use a small cookie scoop to portion the mixture and roll it into tight, 1.5-inch balls. Place them on a parchment-lined baking sheet and freeze for at least 30-60 minutes until very firm.
- Melt and Prep Sticks: While the cake balls are chilling, melt the pink candy melts in the microwave or a double boiler until smooth. Dip the tip of each lollipop stick into the melted candy and insert it about halfway into a frozen cake ball. Return them to the freezer for another 15 minutes to solidify.
- Dip and Decorate: Hold the stick and dip each cake pop into the melted pink candy, coating it completely. Tap off any excess candy. Before the coating sets, add white sprinkles. Place the finished pops upright in a styrofoam block or similar holder to dry completely.