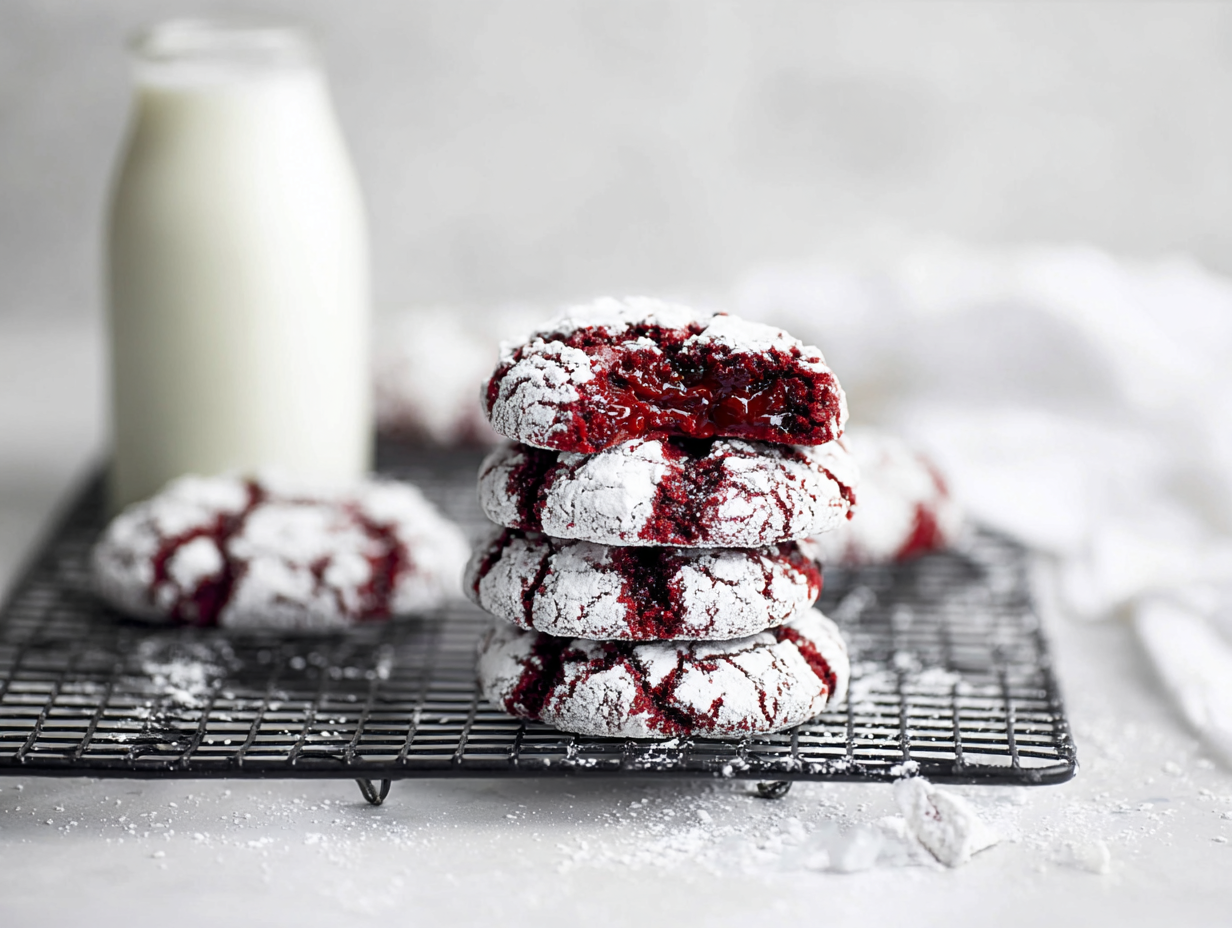
There’s something truly magical about a plate of Red Velvet Crinkle Cookies during the holidays. That vibrant, deep red peeking through a snowy white coating of powdered sugar just screams celebration. I remember the first time I brought a batch to a Christmas party; they vanished in minutes. People are just drawn to them! They look so impressive and complicated, but the secret is they are wonderfully easy to make. This recipe is my go-to because it delivers that perfect soft, fudgy center and slightly chewy edge every single time, making them one of the best holiday treats you can bake.
What I love most about these cookies is that they are completely homemade, a true from scratch recipe that tastes worlds better than any box mix. The flavor is a delicate balance of vanilla and a hint of cocoa, which is the signature of classic red velvet. They are rich, buttery, and have an incredibly satisfying, gooey texture when you bite into them. Whether you’re looking for a standout cookie for a holiday swap, a festive treat for a family gathering, or the perfect cookie to leave out for Santa, this recipe is a guaranteed winner. It’s become a beloved part of our Christmas tradition, and I’m so excited to share it with you.
Ingredients for Red Velvet Crinkle Cookies
This recipe uses simple, everyday ingredients to create a truly special cookie. The key is using quality basics to let that classic red velvet flavor shine through. One important note is on the food coloring; I highly recommend a professional-grade gel food coloring. It gives you that deep, beautiful red without adding the extra liquid that can sometimes alter the cookie’s texture. Before you begin, gather everything up so the process is smooth and enjoyable. There’s nothing worse than realizing you’re out of a key ingredient mid-mix! This is a fantastic recipe for a weekend baking session, filling your home with the warm, inviting scent of freshly baked cookies. It’s a simple list, but it comes together to create something truly memorable.
- Unsalted Butter: 1/2 cup, softened to room temperature.
- Light Brown Sugar: 3/4 cup, packed.
- Granulated Sugar: 1/2 cup for the dough, plus 1/2 cup for rolling.
- Large Eggs: 2, at room temperature.
- Vanilla Extract: 2 teaspoons.
- Red Food Coloring: 1/2 teaspoon of professional gel coloring is recommended.
- All-Purpose Flour: 2 cups.
- Unsweetened Cocoa Powder: 1/3 cup.
- Baking Powder: 1 1/2 teaspoons.
- Salt: 1/2 teaspoon.
- Powdered Sugar: 1/2 cup, for rolling.
How to Make Red Velvet Crinkle Cookies
Making these cookies from scratch is a really rewarding process. The steps are straightforward, making this an easy recipe for bakers of all levels. The most important part is the rolling technique at the end; coating the dough balls first in granulated sugar and then in powdered sugar is the secret to getting that perfect crinkle effect. The granulated sugar acts as a barrier, preventing the powdered sugar from completely melting into the cookie, which allows those beautiful cracks to form as the cookies bake and spread. Just take your time and enjoy the process. Soon your kitchen will be filled with the amazing aroma of these beautiful holiday treats.
- Prepare Your Oven and Pan: First things first, preheat your oven to 350°F. This is crucial for getting the cookies to bake evenly. Line a large baking sheet with parchment paper to prevent sticking and make cleanup a breeze.
- Cream Butter and Sugars: In a large mixing bowl, beat the softened butter, brown sugar, and 1/2 cup of the granulated sugar together. I like to use a stand mixer or a hand mixer for this. Cream them on medium-high speed for about 2-3 minutes until the mixture is light in color and has a fluffy texture.
- Add Wet Ingredients: Scrape down the sides of the bowl to make sure everything is incorporated. Add the room-temperature eggs one at a time, mixing well after each one. Then, mix in the vanilla extract and the red food coloring until the color is uniform.
- Combine Dry Ingredients: In a separate medium bowl, whisk together the all-purpose flour, cocoa powder, baking powder, and salt. This step ensures that the leavening agents are evenly distributed, which helps the cookies rise properly.
- Mix the Dough: Gradually add the dry ingredient mixture to the wet ingredients, mixing on low speed until just combined. Be careful not to overmix here; overmixing can lead to tough cookies. The dough will be soft and a bit sticky. For best results, cover the bowl and chill the dough for at least 30 minutes. This makes it much easier to handle.
- Roll and Coat the Cookies: Place the remaining 1/2 cup of granulated sugar and the 1/2 cup of powdered sugar into two separate shallow bowls. Use a cookie scoop (about 1 tablespoon) to portion the dough. Roll each portion into a smooth ball. First, roll the ball generously in the granulated sugar, then give it a very thick coat of powdered sugar.
- Bake to Perfection: Place the coated dough balls on your prepared baking sheet, leaving about 2 inches of space between them. Bake for 10-12 minutes. The cookies should look puffed up and the tops will have cracked. They will still feel a little soft and gooey in the center, which is exactly what you want for a perfect chewy texture.
- Cool and Enjoy: Let the cookies cool on the baking sheet for a few minutes before transferring them to a wire rack to cool completely. They are incredible with a cold glass of milk!
Tips for The Best Red Velvet Crinkle Cookies
Over the years, I’ve learned a few little things that take these red velvet crinkle cookies from good to absolutely unforgettable. These aren’t complicated tricks, just simple techniques that ensure you get the best possible result every single time you bake them. One of the biggest game-changers for me was realizing the importance of chilling the dough. Even just 30 minutes in the fridge makes the sticky dough so much easier to roll, and it helps prevent the cookies from spreading too much in the oven. This means your cookies will be thicker, chewier, and have a more concentrated flavor. It’s a small step that makes a huge difference in creating that perfect homemade cookie texture. Paying attention to these details is what separates an okay cookie from a spectacular one that everyone will ask you for the recipe for.
Don’t Skip the Double Sugar Roll
The signature look of a crinkle cookie is that beautiful cracked surface. The secret to achieving this isn’t just in the powdered sugar, but in the granulated sugar you roll the dough in first. This initial coating of granulated sugar creates a slight barrier. As the cookie bakes and spreads, this barrier helps absorb some of the melting butter and moisture from the dough, preventing the powdered sugar from completely dissolving. The powdered sugar on top then dries out and cracks as the cookie expands, creating that classic crinkle effect. Be generous with both coatings for the most dramatic and beautiful results.
How do I get a truly gooey center?
The key to a perfectly gooey and chewy red velvet crinkle cookie is to slightly underbake it. Ovens can vary, so it’s important to watch your cookies, not just the clock. You want to pull them out of the oven when the edges are set, the tops are puffed and cracked, but the very center still looks a little soft. They might not look fully done, but they will continue to bake from the residual heat on the hot pan. Letting them cool on the baking sheet for 5 minutes before moving them to a wire rack is a crucial step that allows the center to set up perfectly, resulting in that irresistible fudgy texture we all love.
Substitutions and Variations
While this classic homemade red velvet crinkle cookie recipe is fantastic as is, one of the best parts of baking from scratch is the ability to customize it to your liking. Don’t be afraid to play around with the ingredients a bit to make them your own. Whether you have a dietary need or just want to try a new flavor combination, there are several simple swaps and additions you can make. These cookies are a great canvas for a little creativity, especially around the holidays when you might want to add a special touch. For instance, adding a small amount of espresso powder can deepen the chocolate notes without making the cookies taste like coffee. It’s a simple trick that adds a layer of complexity to the flavor profile, making them taste even richer and more decadent.
- Chocolate Chips: For an extra decadent and gooey treat, try folding in about a cup of white chocolate chips into the dough before chilling. The sweetness of the white chocolate pairs beautifully with the slight tang of the red velvet.
- Cream Cheese Filling: To elevate these even further, make them into sandwich cookies! Whip up a simple cream cheese frosting and pipe it between two cooled cookies. It’s a nod to the classic cream cheese frosting on red velvet cake.
- Gluten-Free Option: While I have not tested this recipe extensively with gluten-free flour, you could try substituting the all-purpose flour with a high-quality 1-to-1 gluten-free baking blend that contains xanthan gum. Be aware that the texture may be slightly different.
- Peppermint Twist: For a festive Christmas variation, add 1/2 teaspoon of peppermint extract along with the vanilla extract. You can also sprinkle some crushed candy canes on top of the cookies right after they come out of the oven.
Frequently Asked Questions
Why didn’t my cookies crinkle?
This is the most common issue people have with crinkle cookies! There are a few culprits. The most likely reason is that the powdered sugar coating wasn’t thick enough or it dissolved into the dough. To prevent this, make sure you are using the double-sugar-roll method (granulated sugar first, then a very heavy coat of powdered sugar). Another reason could be that your dough was too warm and spread too quickly. Chilling the dough for at least 30 minutes helps the cookies hold their shape longer, giving the top a chance to dry and crinkle properly.
Can I make the cookie dough ahead of time?
Absolutely! This is a great recipe to prepare in advance, which is a lifesaver during the busy holiday season. You can make the dough and store it, tightly wrapped, in the refrigerator for up to 3 days. When you’re ready to bake, let it sit on the counter for about 15-20 minutes to soften slightly, which will make it easier to scoop and roll. You can also freeze the dough balls (before rolling in sugar) for up to 3 months.
How do I store these Red Velvet Crinkle Cookies?
Store the completely cooled cookies in an airtight container at room temperature. They will stay soft and delicious for up to 5 days. If you find they are starting to get a little firm, you can place a slice of bread in the container with them. The cookies will absorb the moisture from the bread and soften up again. I don’t recommend refrigerating the baked cookies, as it can dry them out.
The Perfect Holiday Cookie
There you have it, everything you need to know to create the most beautiful and delicious Red Velvet Crinkle Cookies. I truly hope this recipe becomes a cherished part of your baking traditions, just as it has for my family. There is so much joy in the process of making something wonderful from scratch and sharing it with the people you love. These cookies are more than just a sweet treat; they are a festive, easy, and fun way to celebrate the Christmas season. Seeing a plate of these chewy, gooey cookies on a dessert table always brings a smile to my face. So go ahead, preheat your oven, and get ready to bake up some holiday magic. I promise, even Santa would be thrilled to find these waiting for him.
Red Velvet Crinkle Cookies
Ingredients
Equipment
Method
- Prepare Your Oven and Pan: First things first, preheat your oven to 350°F. This is crucial for getting the cookies to bake evenly. Line a large baking sheet with parchment paper to prevent sticking and make cleanup a breeze.
- Cream Butter and Sugars: In a large mixing bowl, beat the softened butter, brown sugar, and 1/2 cup of the granulated sugar together. I like to use a stand mixer or a hand mixer for this. Cream them on medium-high speed for about 2-3 minutes until the mixture is light in color and has a fluffy texture.
- Add Wet Ingredients: Scrape down the sides of the bowl to make sure everything is incorporated. Add the room-temperature eggs one at a time, mixing well after each one. Then, mix in the vanilla extract and the red food coloring until the color is uniform.
- Combine Dry Ingredients: In a separate medium bowl, whisk together the all-purpose flour, cocoa powder, baking powder, and salt. This step ensures that the leavening agents are evenly distributed, which helps the cookies rise properly.
- Mix the Dough: Gradually add the dry ingredient mixture to the wet ingredients, mixing on low speed until just combined. Be careful not to overmix here; overmixing can lead to tough cookies. The dough will be soft and a bit sticky. For best results, cover the bowl and chill the dough for at least 30 minutes. This makes it much easier to handle.
- Roll and Coat the Cookies: Place the remaining 1/2 cup of granulated sugar and the 1/2 cup of powdered sugar into two separate shallow bowls. Use a cookie scoop (about 1 tablespoon) to portion the dough. Roll each portion into a smooth ball. First, roll the ball generously in the granulated sugar, then give it a very thick coat of powdered sugar.
- Bake to Perfection: Place the coated dough balls on your prepared baking sheet, leaving about 2 inches of space between them. Bake for 10-12 minutes. The cookies should look puffed up and the tops will have cracked. They will still feel a little soft and gooey in the center, which is exactly what you want for a perfect chewy texture.
- Cool and Enjoy: Let the cookies cool on the baking sheet for a few minutes before transferring them to a wire rack to cool completely. They are incredible with a cold glass of milk!