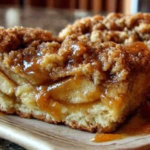
We’re talking an incredibly soft, cake-like crumb infused with a hint of warm nutmeg, perfectly complemented by a luscious, sweet maple glaze that sets beautifully. The balance of sweet maple with subtle spice creates a harmonious flavor profile that’s both nostalgic and incredibly satisfying. Each bar is a little slice of heaven – tender, moist, and bursting with that signature maple goodness you crave.
This recipe isn’t just about baking; it’s about creating a moment of pure bliss, a simple joy to share with loved ones or savor all to yourself with a steaming cup of coffee. It’s perfect for a weekend brunch, a quick breakfast grab-and-go, or an afternoon pick-me-up. Get ready to transform your kitchen into a maple-scented haven. Let’s dive into making these irresistible donut bars that you’ll undoubtedly crave every morning.
Ingredients You’ll Need
- **For the Donut Bars:**
- 2 cups (240g) all-purpose flour, spooned and leveled for accuracy
- 1/2 teaspoon (2g) baking soda
- 1/2 teaspoon (2g) baking powder
- 1/4 teaspoon (1g) salt
- 1/2 teaspoon (1g) ground nutmeg, freshly grated if possible for best flavor
- 1/2 cup (100g) granulated sugar
- 1/4 cup (56g) unsalted butter, softened to room temperature
- 1 large egg, at room temperature for better emulsion
- 1/2 cup (120ml) buttermilk, at room temperature (see note for substitution)
- 1 teaspoon (5ml) vanilla extract, pure vanilla for the best taste
- **For the Maple Glaze:**
- 1/2 cup (60g) powdered sugar (confectioners’ sugar), sifted to prevent lumps
- 2 tablespoons (30ml) pure maple syrup, not pancake syrup
- 1/2 teaspoon (2.5ml) maple extract, optional but enhances maple flavor significantly
- 1–2 tablespoons (15–30ml) milk, adjust as needed for desired glaze consistency
Step-by-Step Instructions
Step 1
**Prep the Pan & Oven:** Preheat your oven to 350°F (175°C). Line a 9×13 inch baking pan with parchment paper, leaving an overhang on the sides for easy lifting. Alternatively, lightly grease and flour the pan. This step ensures your donut bars won’t stick and are easy to remove once baked.
Step 2
**Whisk Dry Ingredients:** In a medium mixing bowl, combine the all-purpose flour, baking soda, baking powder, salt, and ground nutmeg. Whisk these dry ingredients together thoroughly for about 30 seconds to ensure they are well combined and evenly distributed. This prevents pockets of leavening agents in your final product.
Step 3
**Cream Butter & Sugar:** In a separate, larger mixing bowl (or the bowl of a stand mixer fitted with the paddle attachment), cream together the softened unsalted butter and granulated sugar on medium speed. Mix until the mixture is light, fluffy, and pale yellow, typically 2-3 minutes. This process incorporates air, which is crucial for a tender crumb in your donut bars.
Step 4
**Add Wet Ingredients:** To the creamed butter mixture, add the large egg, vanilla extract, and room-temperature buttermilk. Mix on low speed until everything is just combined and smoothly incorporated. Be careful not to overmix at this stage; we just want a uniform liquid base.
Step 5
**Combine Wet & Dry:** Gradually add the reserved dry ingredients to the wet mixture. Mix on low speed until *just* combined. Stop mixing as soon as no streaks of flour are visible. Overmixing develops gluten, which can lead to tough, dry donut bars instead of soft, tender ones.
Step 6
**Fill the Pan:** Pour the prepared batter into your prepared baking pan. Use an offset spatula or the back of a spoon to gently spread the batter evenly across the bottom of the pan. The batter will be relatively thick, so a gentle hand helps here.
Step 7
**Bake to Golden Perfection:** Bake for 18–20 minutes. Begin checking around 18 minutes. The bars are ready when the edges are lightly golden brown and a wooden toothpick inserted into the center comes out clean or with only a few moist crumbs attached. Avoid overbaking, as this will quickly dry out your delicious bars.
Step 8
**Cool the Bars:** Remove the pan from the oven and let the bars cool in the pan for 10 minutes. This allows them to set up and prevents them from breaking when transferred. After 10 minutes, carefully lift the bars out of the pan using the parchment paper overhang and transfer them to a wire rack to cool completely. They must be entirely cool before glazing!
Step 9
**Prepare the Maple Glaze:** While the donut bars are cooling, in a small bowl, whisk together the sifted powdered sugar, pure maple syrup, maple extract (if using), and 1 tablespoon of milk. Add the remaining milk, if needed, half a teaspoon at a time, until you achieve a smooth, pourable, yet thick consistency. The glaze should not be too thin, or it will run off the bars.
Step 10
**Glaze & Serve:** Once the donut bars are completely cool (this is crucial, or the glaze will melt and become messy!), generously spread or drizzle the prepared maple glaze over the top. Allow the glaze to set for at least 15-20 minutes at room temperature before slicing and serving. This creates that lovely, slightly firm donut glaze texture.
Chef’s Tips & Variations
**Achieving the Perfect Texture:** Don’t overmix the batter! Overmixing develops gluten, leading to a tough texture. Mix only until the flour streaks disappear. Also, ensure your butter, egg, and buttermilk are at room temperature for a smoother, more emulsified batter.
**For the Best Glaze:** Sift your powdered sugar for a perfectly smooth, lump-free glaze. Add milk very gradually; it’s easier to add more than to fix a too-thin glaze. If your glaze is too thin, whisk in a little more powdered sugar. If too thick, add a tiny splash of milk.
**Flavor Boosters & Variations:** A pinch of cinnamon alongside the nutmeg can add another layer of warmth. For an extra maple punch, consider sprinkling a few crumbled candied pecans or walnuts over the glaze while it’s still wet. You could also swap the maple extract for a little rum extract for a different twist.
**Make-Ahead & Storage:** These donut bars are best enjoyed the day they are made. However, you can store them in an airtight container at room temperature for up to 2-3 days. If stacking, place parchment paper between layers to prevent sticking. You can also bake the bars ahead of time and glaze them just before serving. These bars are a delightful breakfast or brunch treat with coffee or tea. They also make a fantastic dessert, perhaps with a dollop of whipped cream or a scoop of vanilla ice cream for an extra indulgence.
Frequently Asked Questions
Can I use regular milk instead of buttermilk?
Yes, you can make your own buttermilk substitute! Simply add 1/2 tablespoon of lemon juice or white vinegar to 1/2 cup of regular milk and let it sit for 5 minutes before using. This curdles the milk, mimicking buttermilk’s acidity.
Why are my donut bars tough?
The most common reason for tough baked goods is overmixing the batter. Mix only until the dry and wet ingredients are just combined. Additionally, ensure you’re not overbaking them, as this can dry out the crumb.
Can I freeze these donut bars?
You can freeze the *unglazed* donut bars for up to 2 months in an airtight container. Thaw them at room temperature before glazing. Freezing glazed bars might affect the glaze’s texture and cause it to become sticky.
What if I don’t have maple extract?
While maple extract deepens the maple flavor, you can certainly omit it. The glaze will still be delicious with just pure maple syrup, offering a milder, more natural maple note.
How do I know when the bars are fully cooled for glazing?
The bars should be completely cool to the touch, with absolutely no warmth remaining. If they are even slightly warm, the glaze will melt and absorb into the bars, becoming messy rather than setting beautifully with a slightly firm crust.

Baked Maple Bliss: Irresistibly Soft Donut Bars for Sweet Mornings
Ingredients
Method
- **Prep the Pan & Oven:** Preheat your oven to 350°F (175°C). Line a 9×13 inch baking pan with parchment paper, leaving an overhang on the sides for easy lifting. Alternatively, lightly grease and flour the pan. This step ensures your donut bars won’t stick and are easy to remove once baked.
- **Whisk Dry Ingredients:** In a medium mixing bowl, combine the all-purpose flour, baking soda, baking powder, salt, and ground nutmeg. Whisk these dry ingredients together thoroughly for about 30 seconds to ensure they are well combined and evenly distributed. This prevents pockets of leavening agents in your final product.
- **Cream Butter & Sugar:** In a separate, larger mixing bowl (or the bowl of a stand mixer fitted with the paddle attachment), cream together the softened unsalted butter and granulated sugar on medium speed. Mix until the mixture is light, fluffy, and pale yellow, typically 2-3 minutes. This process incorporates air, which is crucial for a tender crumb in your donut bars.
- **Add Wet Ingredients:** To the creamed butter mixture, add the large egg, vanilla extract, and room-temperature buttermilk. Mix on low speed until everything is just combined and smoothly incorporated. Be careful not to overmix at this stage; we just want a uniform liquid base.
- **Combine Wet & Dry:** Gradually add the reserved dry ingredients to the wet mixture. Mix on low speed until *just* combined. Stop mixing as soon as no streaks of flour are visible. Overmixing develops gluten, which can lead to tough, dry donut bars instead of soft, tender ones.
- **Fill the Pan:** Pour the prepared batter into your prepared baking pan. Use an offset spatula or the back of a spoon to gently spread the batter evenly across the bottom of the pan. The batter will be relatively thick, so a gentle hand helps here.
- **Bake to Golden Perfection:** Bake for 18–20 minutes. Begin checking around 18 minutes. The bars are ready when the edges are lightly golden brown and a wooden toothpick inserted into the center comes out clean or with only a few moist crumbs attached. Avoid overbaking, as this will quickly dry out your delicious bars.
- **Cool the Bars:** Remove the pan from the oven and let the bars cool in the pan for 10 minutes. This allows them to set up and prevents them from breaking when transferred. After 10 minutes, carefully lift the bars out of the pan using the parchment paper overhang and transfer them to a wire rack to cool completely. They must be entirely cool before glazing!
- **Prepare the Maple Glaze:** While the donut bars are cooling, in a small bowl, whisk together the sifted powdered sugar, pure maple syrup, maple extract (if using), and 1 tablespoon of milk. Add the remaining milk, if needed, half a teaspoon at a time, until you achieve a smooth, pourable, yet thick consistency. The glaze should not be too thin, or it will run off the bars.
- **Glaze & Serve:** Once the donut bars are completely cool (this is crucial, or the glaze will melt and become messy!), generously spread or drizzle the prepared maple glaze over the top. Allow the glaze to set for at least 15-20 minutes at room temperature before slicing and serving. This creates that lovely, slightly firm donut glaze texture.