There’s something truly magical about a grilled cheese sandwich. It’s the first thing many of us learn to cook, a go-to comfort food that feels like a warm hug on a plate. But what if I told you we could take that nostalgic classic and make it even better? This Hawaiian Roll Grilled Cheese recipe does exactly that, transforming a simple sandwich into a pull-apart masterpiece of sweet, savory, and cheesy perfection. It’s the kind of dish that silences a room, not because it’s fancy, but because everyone is too busy reaching for another one. It’s a party appetizer, a quick weeknight dinner, and a lazy weekend lunch all rolled into one.
The secret is the incredible combination of textures and flavors. The iconic sweetness of the King’s Hawaiian rolls gets a savory upgrade from a buttery glaze packed with garlic and a hint of Worcestershire sauce. Inside, gooey, melted cheese stretches with every pull. This isn’t just a recipe; it’s an event. It’s the perfect centerpiece for a casual get-together with friends or a movie night with the family. These grilled cheese sliders are incredibly simple to assemble but deliver a taste that feels special and incredibly satisfying. Get ready for this to become your new favorite way to enjoy a classic.
The Best Ingredients for Hawaiian Roll Grilled Cheese
The beauty of this recipe lies in its simplicity. We aren’t using a long list of complicated ingredients; instead, we’re focusing on a few key items that work in perfect harmony. The star, of course, is the pack of Hawaiian rolls. Their signature sweetness is the foundation of this dish, creating that irresistible sweet and savory contrast that keeps you coming back for more. When you combine that with rich, melted cheese and a savory butter topping, you create something truly special. Don’t be tempted to skip the butter glaze—it’s what elevates these sliders from a simple snack to a memorable meal. The garlic powder, onion powder, and Worcestershire sauce seep into the tops of the rolls as they bake, adding a depth of flavor that perfectly complements the gooey cheese inside. It’s a simple step that makes a world of difference, turning a good dish into a great one.
When it comes to the cheese, you have options, but the goal is maximum meltiness. Classic American cheese is a fantastic choice for its unparalleled ability to turn into a smooth, creamy, liquid gold. If you prefer a bit more flavor, a mild or medium cheddar works beautifully, offering a slightly sharper taste that pairs well with the sweet rolls. Provolone is another excellent option, known for its fantastic cheese-pull factor. For this recipe, I find that pre-packaged slices are the easiest and most convenient, ensuring even coverage without any fuss. While I often advocate for grating your own cheese, this is one of those times where the simplicity of slices just makes sense. You want a cheese that will melt seamlessly into the soft bread, creating a single, unified bite of cheesy goodness.
The Perfect Cheese Pull
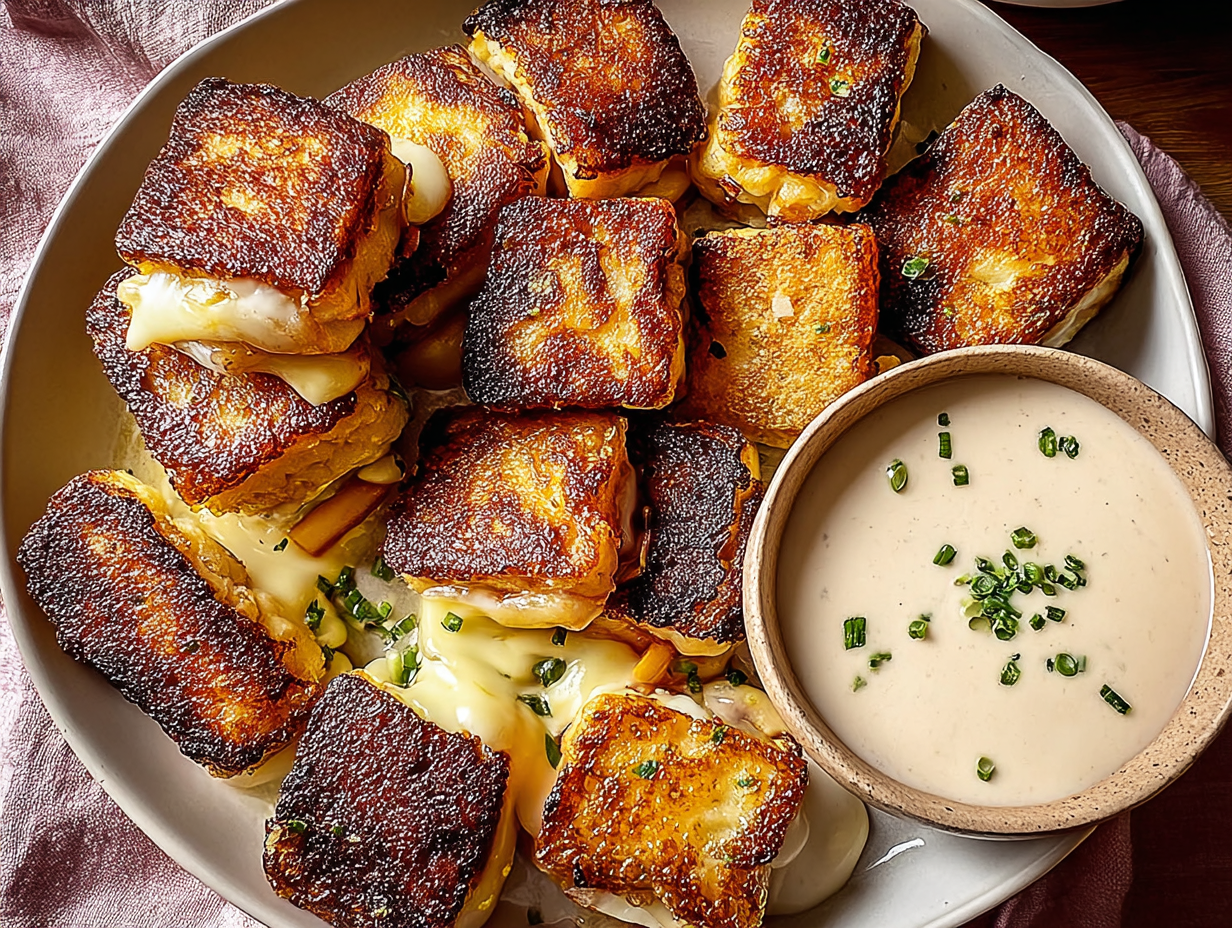
The goal of any great grilled cheese is that satisfying, stringy cheese pull, and these sliders are no exception. The key is using the right amount of cheese and not overbaking the rolls. You want the cheese to be fully melted and gooey, but not so hot that it becomes oily or separates. Following the two-step baking process—first covered with foil, then uncovered—is crucial. The initial covered baking time steams the rolls and gently melts the cheese all the way through. The final few minutes uncovered are just to toast the tops and give them that beautiful golden-brown color. This method ensures the cheese is at its peak melting point right when you pull them out of the oven. Let them rest for just a minute or two before serving, which allows the cheese to set just enough to give you that perfect, Instagram-worthy stretch when you pull a slider away from the pack.
- 1 (12-count) package King’s Hawaiian Original Hawaiian Sweet Rolls
- 8 slices mild cheddar or American cheese
- 1/4 cup salted butter, melted
- 1 teaspoon Worcestershire sauce
- 1/2 teaspoon garlic powder
- 1/2 teaspoon onion powder
Can I use other types of rolls?
Absolutely. While King’s Hawaiian rolls provide that signature sweet flavor, any soft, pull-apart dinner rolls will work as a substitute. Look for brioche sliders or other soft yeast rolls that are connected in a slab for the easiest preparation.
Step-by-Step Instructions
One of the best things about this Hawaiian Roll Grilled Cheese recipe is how quickly it comes together. It’s a low-effort, high-reward dish that’s perfect for those days when you need something delicious without spending hours in the kitchen. The entire process is straightforward, from slicing the rolls to brushing on the savory butter glaze. The key is to keep the slab of rolls intact. Instead of separating each roll individually, you’ll slice the entire package in half horizontally, like you’re opening a book. This creates a top and bottom bun for your giant, shareable grilled cheese. This method not only saves a ton of time but also ensures that the melted cheese is perfectly contained within the sliders, creating a gooey center that’s ready to be pulled apart and devoured. It’s a simple trick that makes assembly a breeze and guarantees a perfect result every time.
To make Hawaiian Roll Grilled Cheese, preheat your oven to 350°F (175°C). Slice a 12-pack of Hawaiian rolls in half horizontally without separating them. Place the bottom slab in a baking dish, layer with 8 slices of cheddar or American cheese, and replace the top slab. In a small bowl, whisk together 1/4 cup of melted butter, 1 teaspoon of Worcestershire sauce, 1/2 teaspoon of garlic powder, and 1/2 teaspoon of onion powder. Brush this mixture evenly over the tops of the rolls. Cover the dish with aluminum foil and bake for 10-12 minutes. Finally, remove the foil and bake for an additional 3-5 minutes, until the tops are golden brown and the cheese is perfectly melted and bubbly. Serve immediately for the best experience.
- Preheat and Prep: Preheat your oven to 350°F (175°C). Lightly grease a 9×9 inch baking dish or line it with parchment paper for easy cleanup.
- Slice the Rolls: Using a long serrated knife, carefully slice the entire slab of Hawaiian rolls in half horizontally. Don’t pull the individual rolls apart. Place the bottom half of the rolls into your prepared baking dish.
- Layer the Cheese: Arrange the cheese slices in an even layer over the bottom slab of rolls, covering the entire surface.
- Assemble the Sliders: Place the top half of the rolls back onto the cheese-covered bottom half.
- Make the Savory Glaze: In a small bowl, whisk together the melted butter, Worcestershire sauce, garlic powder, and onion powder until well combined.
- Brush the Tops: Generously brush the savory butter mixture all over the tops and sides of the rolls, making sure to get into all the crevices.
- Bake Covered: Cover the baking dish tightly with aluminum foil. Bake for 10-12 minutes. This step is crucial for melting the cheese evenly without burning the tops.
- Bake Uncovered: Remove the foil and bake for another 3-5 minutes, or until the tops of the rolls are lightly golden brown and toasted.
- Serve Warm: Let the sliders cool for a minute or two in the pan before serving. Use a knife to slice them apart or let everyone pull their own right from the dish.
How do I get the cheese perfectly melted?
The trick is the two-stage baking process. Covering the dish with foil for the initial bake traps steam and heat, allowing the cheese to melt into a perfectly gooey layer. Removing the foil for the last few minutes is purely to toast the tops, so watch them carefully to prevent them from getting too dark.
Tips for the Perfect Hawaiian Roll Grilled Cheese
Over the years, I’ve made these grilled cheese sliders for countless gatherings, and I’ve picked up a few small tricks that make a big difference. First and foremost, don’t be shy with the butter glaze. It might seem like a lot, but it’s the secret weapon of this recipe. Use a pastry brush to guide it over the tops and down the sides of every single roll. This ensures that every bite is packed with that delicious, savory flavor that balances the sweetness of the bread. Another tip is to let them rest for just a moment after they come out of the oven. I know it’s tempting to dive right in, but giving them sixty seconds to cool allows the cheese to set slightly, which leads to a much more satisfying and less messy cheese pull. It’s a small act of patience that pays off in a big way.
Get Creative with Your Glaze
While the savory butter glaze in the recipe is a classic, don’t be afraid to experiment. This is where you can really make the recipe your own. For a bit of herbal freshness, try adding a teaspoon of dried parsley or a sprinkle of Italian seasoning to the butter mixture. If you like a bit of texture and nutty flavor, a tablespoon of poppy seeds or sesame seeds sprinkled over the top before baking is a fantastic addition. For those who enjoy a bit of heat, a pinch of red pepper flakes or a dash of your favorite hot sauce can be whisked into the butter to give the sliders a subtle kick. The glaze is a canvas for your creativity, so feel free to play around with different herbs and spices to find your perfect flavor combination. The key is to complement, not overpower, the core flavors of the sweet rolls and melted cheese.
One common issue people face is the bottoms of the rolls getting a little too soft or soggy. To avoid this, make sure your baking dish isn’t overcrowded and consider placing the bottom slab of rolls in the preheating oven for just a minute or two on its own to toast it slightly before adding the cheese. This creates a small barrier that helps keep the bread from absorbing too much moisture. Also, serve them fresh. These sliders are at their absolute best right out of the oven when the tops are crispy, the bread is soft, and the cheese is perfectly gooey. While leftovers are still delicious, they won’t have that same fresh-from-the-oven texture, so plan to serve and enjoy them immediately for the ultimate Hawaiian Roll Grilled Cheese experience.
Can I assemble these ahead of time?
Yes, you can assemble the sliders (placing the cheese between the rolls in the baking dish) a few hours in advance. Cover and refrigerate them. However, wait to add the melted butter glaze until just before you’re ready to bake to prevent the rolls from becoming soggy.
Fun Substitutions and Variations
This Hawaiian Roll Grilled Cheese recipe is a fantastic starting point, but it’s also incredibly versatile. Think of it as a blank canvas for all sorts of delicious additions. One of the most popular variations is to add a layer of meat, turning them into hearty little sandwiches. Thinly sliced deli ham is a natural fit, creating the classic sweet and salty combination found in a Monte Cristo. Crispy, crumbled bacon adds a wonderful smoky flavor and a bit of crunch that takes these sliders to a whole new level. You could also use shredded rotisserie chicken tossed in a little barbecue sauce for a sweet and tangy twist. The key is to add ingredients that complement the existing flavors without overwhelming the simple perfection of the grilled cheese itself. A thin layer is all you need to add a new dimension of flavor.
Flavor Twists and Add-Ins
Beyond adding meat, there are plenty of other ways to customize these sliders. For a touch of gourmet flavor, try spreading a thin layer of fig jam or apple butter on the inside of the rolls before adding the cheese. The extra sweetness pairs beautifully with a sharp cheddar or a nutty Gruyère. If you want to sneak in some veggies, a layer of caramelized onions or sautéed mushrooms adds a deep, umami-rich flavor that is absolutely divine. For those who love a bit of spice, layering in some pickled jalapeños or using pepper jack cheese will provide a welcome kick of heat. You can even change up the dipping sauce. While they are amazing on their own, serving them with a side of warm marinara sauce, spicy ranch, or a tangy honey mustard can completely transform the experience.
- Ham and Cheese: Add a thin layer of deli ham on top of the cheese before adding the top slab of rolls.
- Bacon Grilled Cheese: Sprinkle cooked, crumbled bacon over the cheese for a smoky, salty crunch.
- Spicy & Sweet: Use pepper jack cheese and add a layer of thinly sliced jalapeños for a spicy kick.
- Italian Style: Use provolone cheese, add a sprinkle of Italian seasoning to the butter glaze, and serve with a side of marinara sauce for dipping.
- Breakfast Sliders: Layer in scrambled eggs and cooked sausage or bacon for a delicious breakfast or brunch option.
What are the best cheeses to use for variations?
For variations, consider cheeses that complement your additions. Gruyère is fantastic with ham and caramelized onions. Muenster is incredibly creamy and works well with bacon. A good quality provolone is perfect for an Italian-style slider, and you can never go wrong with a sharp white cheddar for a more robust cheese flavor.
Frequently Asked Questions
How do I store and reheat leftover Hawaiian Roll Grilled Cheese?
While these are best enjoyed fresh, you can store leftovers in an airtight container in the refrigerator for up to two days. The best way to reheat them is in the oven or an air fryer. Place them on a baking sheet and heat at 350°F (175°C) for 5-7 minutes, or until warmed through and the tops are crispy again. I would avoid the microwave, as it tends to make the bread soft and chewy rather than toasty.
Can I make these in an air fryer?
Yes, an air fryer works wonderfully for making these sliders, especially if you’re making a smaller batch. Depending on the size of your air fryer, you may need to cut the slab of rolls in half. Assemble as directed and place them in the air fryer basket. Cook at 325°F (160°C) for about 5-8 minutes. You may want to cover them with a small piece of foil for the first few minutes to ensure the cheese melts before the tops get too brown.
What should I serve with these grilled cheese sliders?
These sliders are incredibly versatile and can be served as an appetizer, a main course for lunch, or a simple dinner. They are a natural pairing for a classic bowl of tomato soup. For a lighter meal, serve them alongside a simple green salad with a vinaigrette dressing. They also make a fantastic party food and go well with other finger foods like french fries, tater tots, or a fresh veggie platter with dip.
The Perfect Bite Every Time
There is such a deep satisfaction that comes from making food that brings people together, and this Hawaiian Roll Grilled Cheese recipe is one of those dishes. It’s more than just a meal; it’s a shared experience. The moment you place that warm, golden-brown tray on the table, you’ll see hands reaching from every direction, eager to pull apart a cheesy, buttery slider. It’s a recipe built on simple, comforting flavors that have been elevated just enough to feel special. The balance of the sweet roll, the savory glaze, and the gooey, melted cheese is a combination that truly never fails to impress. It’s proof that you don’t need complicated techniques or exotic ingredients to create something utterly delicious and memorable.
Whether you’re making these for a game day party, a kid’s birthday, or just a cozy night in, they are guaranteed to be a hit. This is the kind of recipe that gets passed around, requested again and again, and becomes a staple in your cooking rotation. It’s a reminder that sometimes the best food is also the simplest. I truly hope you give this recipe a try and that it brings as much joy to your table as it has to mine. There’s nothing better than watching your friends and family enjoy a warm, delicious meal you’ve prepared with love. Enjoy every single cheesy, pull-apart bite of these amazing grilled cheese sliders.
Hawaiian Roll Grilled Cheese
Ingredients
Equipment
Method
- Preheat your oven to 350°F (175°C). Lightly grease a 9×9 inch baking dish or line it with parchment paper for easy cleanup.
- Using a long serrated knife, carefully slice the entire slab of Hawaiian rolls in half horizontally. Don’t pull the individual rolls apart. Place the bottom half of the rolls into your prepared baking dish.
- Arrange the cheese slices in an even layer over the bottom slab of rolls, covering the entire surface.
- Place the top half of the rolls back onto the cheese-covered bottom half.
- In a small bowl, whisk together the melted butter, Worcestershire sauce, garlic powder, and onion powder until well combined.
- Generously brush the savory butter mixture all over the tops and sides of the rolls, making sure to get into all the crevices.
- Cover the baking dish tightly with aluminum foil. Bake for 10-12 minutes. This step is crucial for melting the cheese evenly without burning the tops.
- Remove the foil and bake for another 3-5 minutes, or until the tops of the rolls are lightly golden brown and toasted.
- Let the sliders cool for a minute or two in the pan before serving. Use a knife to slice them apart or let everyone pull their own right from the dish.