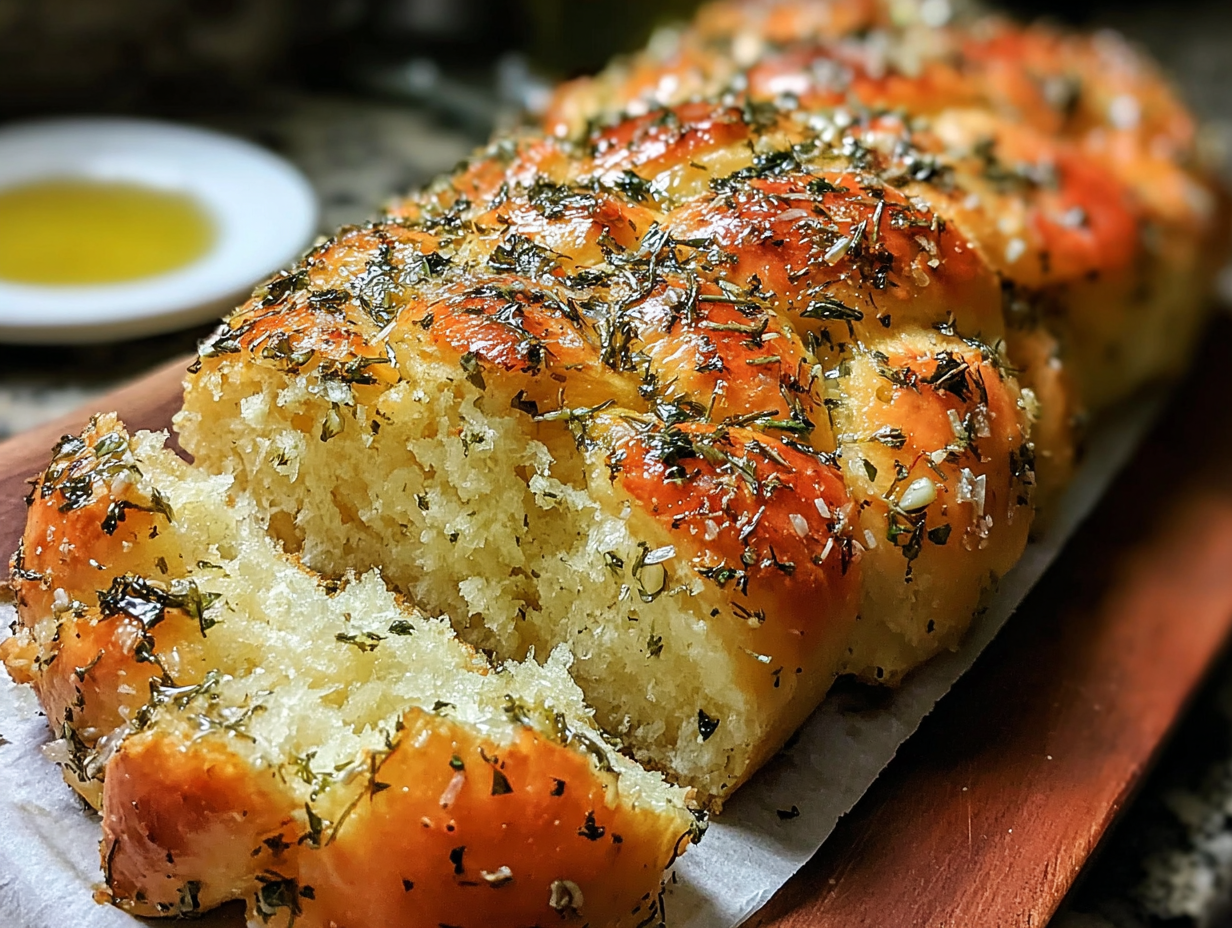
There’s a certain kind of magic that happens when you bake bread at home. It’s more than just mixing flour and water; it’s the warmth that spreads from the oven, the incredible aroma that fills every corner of your house, and the deep satisfaction of creating something truly comforting from scratch. This Garlic Parmesan Herb Bread recipe is the embodiment of that feeling. It’s a simple, rustic loaf that doesn’t require complex techniques or hours of kneading, yet it delivers a flavor so rich and savory it feels like a special occasion. The combination of pungent garlic, salty Parmesan, and a trio of classic herbs creates a bread that is impossibly soft on the inside with a beautifully golden, buttery crust.
This isn’t just another bread recipe; it’s the one I turn to when I need a guaranteed win. It’s the perfect Homemade Dinner Bread to serve alongside a hearty stew, the ultimate Bread To Go With Pasta, and a fantastic appetizer all on its own, especially when served warm with a little extra butter. I’ve brought these loaves to family dinners, potlucks, and holiday gatherings, and they disappear every single time. The process is straightforward enough for a beginner, but the result is a loaf that tastes like it came from an artisan bakery. It’s the kind of recipe that builds confidence and makes you fall in love with baking. Whether you’re looking for comforting Homemade Bread To Go With Soup on a chilly evening or impressive Homemade Bread Appetizers for guests, this recipe is your answer.
Garlic Parmesan Herb Bread Ingredients
One of the best things about this Garlic Parmesan Herb Bread is that it uses simple, common ingredients you likely already have in your pantry. There’s nothing fancy here, just basic staples that come together to create something truly special. The magic is in the combination—the sharp, savory notes of garlic and Parmesan are balanced perfectly by the earthy, aromatic blend of basil, oregano, and rosemary. For the best flavor, I always recommend using freshly minced garlic and a good quality block of Parmesan that you grate yourself. The pre-shredded kind often contains anti-caking agents that can affect how it melts into the dough. This simple list is all you need to create a bread that will impress everyone.
- 1 cup warm water (about 100-110°F)
- 1 tablespoon granulated sugar
- 1 tablespoon instant dry yeast
- 1 teaspoon salt
- 2 teaspoons dried rosemary
- 1 teaspoon dried basil
- 1 teaspoon dried oregano
- 6 cloves garlic, finely chopped
- ⅓ cup parmesan cheese, grated
- 2 to 2½ cups all-purpose flour
- 2 tablespoons olive oil
- 1 tablespoon butter, melted (for topping)
What kind of yeast is best for this bread?
This recipe calls for instant dry yeast, which is my go-to for quick and reliable results. It can be mixed directly with the dry ingredients without needing to be proofed first, though I still like to give it a minute in warm water with sugar to make sure it’s active and foamy. If you only have active dry yeast, you can absolutely use it! Just make sure to dissolve it in the warm water and sugar and let it sit for about 5-10 minutes, until it becomes foamy, before adding the other ingredients. This extra step ensures your yeast is alive and ready to make your dough rise beautifully.
How to Make Garlic Parmesan Herb Bread
Following this Bake Bread Recipe is a relaxing and rewarding process. The steps are designed to be clear and straightforward, guiding you from a few simple ingredients to two gorgeous, golden loaves of bread. The key is to trust the process. Don’t rush the rising times, as this is where the dough develops its flavor and airy texture. Pay attention to how the dough feels; it should be soft and slightly tacky, but not overly sticky. When you’re shaping the loaves, be gentle to preserve the air bubbles your yeast has worked so hard to create. This is more than just a set of instructions; it’s a guide to creating a truly memorable loaf of bread that will become a staple in your home. It’s a fantastic Pasta Bread Recipe that your family will ask for again and again.
- Activate the Yeast: In a large bowl, combine the warm water, sugar, and instant dry yeast. Give it a gentle stir and let it sit for a minute or two. You should see it start to get a little foamy on top, which is a great sign that your yeast is active and ready to go.
- Mix the Flavorings: Stir in the salt, chopped garlic, dried rosemary, basil, and oregano. Mix until everything is well blended and the water is fragrant with herbs and garlic.
- Form the Dough: Add 2 cups of the all-purpose flour and the grated parmesan cheese to the bowl. Use a spatula or wooden spoon to mix until a sticky, shaggy dough forms.
- Knead and Adjust: Gradually add more flour, about a tablespoon at a time, while mixing (or kneading on a lightly floured surface) until the dough becomes soft, stretchy, and is no longer overly sticky. It should be smooth and elastic.
- First Rise: Lightly oil a clean bowl with olive oil. Place the dough inside, turning it once to coat. Cover the bowl with a clean kitchen towel or plastic wrap and let it rise in a warm, draft-free spot for about an hour, or until it has doubled in size.
- Preheat and Prepare: Towards the end of the rising time, preheat your oven to 375°F (190°C). Grease a baking sheet with a little olive oil or line it with parchment paper.
- Shape the Loaves: Gently punch down the risen dough to release the air. Divide it into two equal pieces. Shape each piece into a round ball and place them on the prepared baking sheet, leaving some space between them.
- Second Rise: Cover the loaves loosely with the towel or plastic wrap and let them rise for another 15-20 minutes. They’ll get a little puffy.
- Add Topping: Gently brush the melted butter over the tops of each dough round. This will give them a beautiful golden color and a delicious, rich crust.
- Bake to Perfection: Bake for 18-20 minutes. The bread is done when the tops are a deep golden brown and the loaf sounds hollow when you tap the bottom.
- Cool and Serve: Remove the bread from the oven and transfer the loaves to a wire cooling rack. Let them cool for at least 10 minutes before slicing. This bread is absolutely divine served warm with extra butter.
Tips & Tricks for Perfect Garlic Parmesan Herb Bread
Over the years, I’ve learned a few little things that take this Garlic Parmesan Herb Bread from good to absolutely unforgettable. First, don’t be shy with the garlic! Six cloves might sound like a lot, but its flavor mellows during baking, infusing the entire loaf with a wonderful savory depth. If you’re a true garlic lover, you could even add an extra clove or two. Another tip is to monitor your flour. The amount needed can vary slightly depending on humidity and the brand of flour you use. The goal is a soft, pliable dough, not a stiff, heavy one. Add the last half-cup of flour gradually until the dough is easy to handle but still a little soft. This restraint is key to a tender crumb and is crucial for many Bread Recipes Dinner relies on.
When it’s time to let the dough rise, find the warmest spot in your house. For me, that’s often on top of the refrigerator or inside the oven with just the oven light on (make sure the oven is off!). This gentle, consistent warmth encourages the yeast to work its magic, giving you a beautiful, airy rise. Finally, don’t skip the final butter-brushing step. It seems small, but melting a tablespoon of butter and brushing it over the loaves just before they go into the oven is what creates that irresistible, golden-brown, and slightly crisp crust. It’s a simple finishing touch that makes these loaves look as good as they taste, making them perfect for special occasions like Bread Recipes Thanksgiving tables.
How do I know when the bread is fully baked?
The visual cue is a deep golden-brown crust. However, the most reliable method is the “thump test.” Carefully remove a loaf from the oven and turn it over (using an oven mitt!). Gently tap the bottom of the loaf with your thumb. If it sounds hollow, like a drum, it’s perfectly baked. If it makes a dull thud, it needs a few more minutes in the oven. This trick ensures your bread is cooked through without being dry.
Substitutions & Variations
The beauty of a simple recipe like this Garlic Parmesan Herb Bread is its versatility. It’s a wonderful canvas for your own creativity. Don’t feel locked into the exact herbs listed; think of them as a starting point. You can easily swap them out based on what you have on hand or what you’re serving the bread with. A combination of thyme and sage would be fantastic for a fall meal, while a pinch of red pepper flakes can add a welcome kick of heat. The cheese is also adaptable. While Parmesan provides a classic nutty, salty flavor, other hard, aged cheeses work beautifully. Try using Asiago for a sharper bite or Pecorino Romano for an even saltier, more intense flavor.
If you have fresh herbs, by all means, use them! The general rule of thumb is to use three times the amount of fresh herbs as dried. So, for this recipe, you would use about two tablespoons of fresh rosemary and one tablespoon each of fresh basil and oregano, all finely chopped. You can also add other ingredients to the dough for more texture and flavor. A handful of sun-dried tomatoes (chopped) or some chopped Kalamata olives would be delicious additions. For a richer dough, you can even substitute half of the water with warm milk. These small changes can transform the loaf and tailor it perfectly to your meal, whether you’re making a Pasta Bread Recipe or an appetizer.
Can I use bread flour instead of all-purpose flour?
Yes, you can definitely use bread flour in this recipe. Bread flour has a higher protein content than all-purpose flour, which will result in a slightly chewier loaf with a bit more structure. The bread will be just as delicious, just with a different texture. You can substitute it one-for-one. Conversely, if you want an even softer, more tender crumb, you could try using half all-purpose flour and half pastry flour.
Frequently Asked Questions
Can I make this dough in a bread machine?
Absolutely! This recipe adapts well to a bread machine, which is great news for fans of Bread Recipes Bread Maker style. Simply add all the ingredients to your bread machine pan in the order recommended by the manufacturer (usually liquids first, then dry ingredients, with the yeast last). Set it to the “Dough” cycle. Once the cycle is complete, you can remove the dough, divide and shape it into two rounds, and proceed with the second rise and baking instructions as written in the recipe.
How should I store leftover Garlic Parmesan Herb Bread?
To store leftover bread, allow it to cool completely to room temperature. Storing it while still warm will create condensation and can make the crust soggy. Once cool, you can store it in a bread box or a paper bag at room temperature for up to 3 days. I avoid storing it in the refrigerator, as that can cause the bread to go stale faster. For longer storage, you can freeze it. Wrap the cooled loaf tightly in plastic wrap and then in aluminum foil and freeze for up to 3 months.
What is best to serve with this bread?
This bread is incredibly versatile! It’s the perfect Bread To Go With Pasta of any kind, excellent for sopping up sauce. It also makes a fantastic side for soups and stews, making it a go-to for Homemade Bread To Go With Soup. You can also serve it as an appetizer, either on its own, with a side of marinara for dipping, or as part of a larger cheese or charcuterie board. It’s truly a wonderful all-purpose Homemade Dinner Bread.
Conclusion
There is something so fundamentally satisfying about pulling a loaf of homemade Garlic Parmesan Herb Bread from the oven. The process itself is a joy—the feel of the soft dough, the patience of the rise, and the incredible aroma that signals something wonderful is about to happen. This recipe is more than just food; it’s an experience that brings warmth and comfort to your kitchen. It’s a reminder that the best things in life are often the simplest, made with our own two hands. I hope this recipe becomes a favorite in your home, a reliable choice for your Bread Recipes Dinner rotation, and a loaf you’re proud to share. So go ahead, get your hands dusty with flour, and enjoy every moment of creating—and devouring—this delicious bread.
Garlic Parmesan Herb Bread
Ingredients
Equipment
Method
- Activate the Yeast: In a large bowl, combine the warm water, sugar, and instant dry yeast. Give it a gentle stir and let it sit for a minute or two. You should see it start to get a little foamy on top, which is a great sign that your yeast is active and ready to go.
- Mix the Flavorings: Stir in the salt, chopped garlic, dried rosemary, basil, and oregano. Mix until everything is well blended and the water is fragrant with herbs and garlic.
- Form the Dough: Add 2 cups of the all-purpose flour and the grated parmesan cheese to the bowl. Use a spatula or wooden spoon to mix until a sticky, shaggy dough forms.
- Knead and Adjust: Gradually add more flour, about a tablespoon at a time, while mixing (or kneading on a lightly floured surface) until the dough becomes soft, stretchy, and is no longer overly sticky. It should be smooth and elastic.
- First Rise: Lightly oil a clean bowl with olive oil. Place the dough inside, turning it once to coat. Cover the bowl with a clean kitchen towel or plastic wrap and let it rise in a warm, draft-free spot for about an hour, or until it has doubled in size.
- Preheat and Prepare: Towards the end of the rising time, preheat your oven to 375°F (190°C). Grease a baking sheet with a little olive oil or line it with parchment paper.
- Shape the Loaves: Gently punch down the risen dough to release the air. Divide it into two equal pieces. Shape each piece into a round ball and place them on the prepared baking sheet, leaving some space between them.
- Second Rise: Cover the loaves loosely with the towel or plastic wrap and let them rise for another 15-20 minutes. They’ll get a little puffy.
- Add Topping: Gently brush the melted butter over the tops of each dough round. This will give them a beautiful golden color and a delicious, rich crust.
- Bake to Perfection: Bake for 18-20 minutes. The bread is done when the tops are a deep golden brown and the loaf sounds hollow when you tap the bottom.
- Cool and Serve: Remove the bread from the oven and transfer the loaves to a wire cooling rack. Let them cool for at least 10 minutes before slicing. This bread is absolutely divine served warm with extra butter.