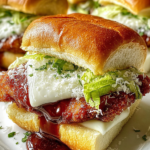
There are some recipes that feel like a warm hug, and these easy Ham and Cheese Sticks are definitely one of them. I remember one particularly chaotic Tuesday afternoon when my kids came home from school absolutely ravenous, and I had a house full of their friends coming over in an hour. Panic started to set in until I remembered the tubes of crescent dough in the fridge. What followed was a flurry of happy activity, rolling out dough, layering ham and cheese, and letting the kids help brush on the savory butter glaze. It turned a stressful moment into a fun, delicious memory. These have since become our go-to for just about everything, from **Quick Snacks On The Go** to the star of the show at a family get-together.

What makes this recipe so special is its incredible simplicity and versatility. You’re using everyday ingredients to create something that feels a little bit indulgent and deeply satisfying. The buttery, flaky crescent dough wraps around savory ham and gooey, melted cheddar, and the topping adds an extra layer of flavor that’s just irresistible. They are the perfect answer when you need **Warm Snacks For Party** settings or just some **Yummy Homemade Snacks** without spending hours in the kitchen. They are also one of my favorite **Fun Treats To Make With Kids** because their little hands are perfect for rolling everything up. Whether you need something for a potluck, a game day, or an after-school treat, these ham and cheese sticks deliver every single time.
Ingredients for Ham and Cheese Sticks
- Crescent Dough Sheets: Two 8-ounce tubes. The seamless sheets are easiest, but the regular perforated kind works too, just pinch the seams together.
- Deli-Sliced Ham: About a pound of your favorite ham, sliced thin but not shaved.
- Cheddar Cheese Sticks: Eight sticks. These are perfect for getting that ideal cheese-to-dough ratio.
- Melted Butter: A quarter cup for the rich, savory glaze.
- Worcestershire Sauce: One teaspoon adds a wonderful depth and umami flavor.
- Dijon Mustard: Half a tablespoon gives a tangy kick that cuts through the richness.
- Dried Minced Onion: Half a tablespoon. Onion powder is a fine substitute if that’s what you have.
- Poppy Seeds: Half a tablespoon for that classic look and subtle crunch on top.
How to Make Ham and Cheese Sticks
- Get Ready: First things first, preheat your oven to 350°F (175°C). This is a crucial step to ensure they bake evenly. Go ahead and line a large baking sheet with parchment paper. This not only prevents sticking but makes cleanup a breeze.
- Prep the Dough: Carefully unroll your two crescent dough sheets on a clean, lightly floured surface. Using a pizza cutter or a sharp knife, cut each sheet into four equal rectangular pieces. You’ll end up with eight pieces total, ready for their delicious fillings.
- Assemble the Sticks: Now for the fun part! Lay out the ham evenly across your eight dough rectangles. Don’t be shy with it! Place one cheddar cheese stick on the edge of each piece, right on top of the ham. Gently fold in the short ends of the dough over the cheese stick, then roll it all up snugly like a little sleeping bag. This helps keep all that cheesy goodness from escaping.
- Arrange for Baking: Place each rolled-up stick on your prepared baking sheet, leaving a little space between them so they can bake up golden and beautiful without sticking together.
- Mix the Magic Glaze: In a small bowl, whisk together the melted butter, Worcestershire sauce, Dijon mustard, dried minced onion, and poppy seeds. The smell alone will tell you you’re on the right track! This mixture is what takes these from good to absolutely amazing.
- Brush with Flavor: Using a pastry brush, generously coat the top and sides of each ham and cheese stick with the butter mixture. Make sure to get it into all the little crevices. This glaze creates the perfect savory, golden-brown crust.
- Bake to Perfection: Slide the baking sheet into your preheated oven. Bake for 12 to 15 minutes. You’re looking for a beautiful, deep golden-brown color and maybe a little bit of bubbly cheese peeking out.
- Serve and Enjoy: The hardest part! Let them cool for just a minute or two before serving. These are best enjoyed hot and fresh, when the cheese is perfectly gooey. They are truly one of the best **Hearty Snacks For A Crowd**.
Tips & Tricks for the Best Ham and Cheese Sticks
Over the years, I’ve made these ham and cheese sticks more times than I can count, and I’ve picked up a few little secrets for making them absolutely perfect. The most important tip is to keep your crescent dough cold until you are ready to use it. Warm dough gets sticky and is much harder to roll out and work with. If your kitchen is warm, work quickly! A good, tight seal is also your best friend. When you roll them up, pinch the final seam firmly to prevent a “cheese-plosion” in the oven. While a little leakage is delicious, you want most of that gooey cheddar to stay inside. This ensures every bite is as cheesy and wonderful as the last, making them one of the most reliable **Good Snacks For Kids**.
The Glaze Makes All the Difference
Don’t even think about skipping the butter glaze! It might seem like an extra step, but it’s what elevates these from a simple snack to something truly special. The combination of savory Worcestershire, tangy Dijon, and aromatic onion powder creates a flavor profile that perfectly complements the ham and cheese. When you brush it on, be generous. Let it pool a little in the seams. As it bakes, it creates a crisp, flavorful crust that is simply irresistible. This is what makes them such a requested item and one of the best **Warm Snacks For Party** menus. Trust me, this simple mixture is the key to rave reviews every single time you make them.
FAQ: Why did my sticks get soggy on the bottom?
A soggy bottom can be a real bummer, but it’s an easy problem to fix! This usually happens for one of two reasons. First, always use parchment paper. A greased baking sheet can sometimes cause the bottoms to fry and become greasy, which can feel soggy. Parchment paper creates a barrier and promotes even, dry heat. Second, don’t let the assembled sticks sit on the baking sheet for too long before baking, especially if you were very generous with the glaze. The butter can seep underneath and prevent the bottom dough from crisping up. Assemble, glaze, and get them right into that hot oven for the best results.
Substitutions & Variations for Ham and Cheese Sticks
One of the best things about this recipe is how easily you can adapt it to your own tastes or what you happen to have in the fridge. It’s a fantastic base for all sorts of creative flavor combinations. Don’t feel locked into just ham and cheddar; think of this as a template for deliciousness. This is one of those **Recipes With Ham In It** that can easily become a recipe with something else! For example, you can transform them into pizza rolls by using sliced pepperoni, mozzarella sticks, and serving them with a side of marinara for dipping. It’s a simple swap that completely changes the character of the snack and is always a huge hit, especially with kids.
Ingredient Swaps
- Meats: Thinly sliced turkey, roast beef, or prosciutto would all be fantastic. For a vegetarian option, you could even skip the meat and add a strip of bell pepper or some spinach (be sure to squeeze it very dry!).
- Cheeses: Don’t limit yourself to cheddar! Provolone, Swiss, mozzarella, or pepper jack cheese sticks would all melt beautifully and add a different flavor profile.
- Dough: While crescent dough is wonderfully flaky and buttery, puff pastry is a great alternative. It will give you a crispier, more layered texture. Just be sure to follow the baking instructions on the puff pastry package, as it may differ slightly.
- Glaze: Feel free to play with the glaze. Swap the Dijon for honey mustard for a sweeter tang, or add a dash of garlic powder or a sprinkle of everything bagel seasoning for a different savory note.
By making a few of these simple changes, you can create lighter versions for **Light Party Snacks** or cater to different dietary preferences. The core method remains the same, proving just how robust and versatile this simple recipe truly is. Experiment and find your family’s perfect combination!
Frequently Asked Questions
Can I make these ham and cheese sticks ahead of time?
Yes, absolutely! This is one of the reasons they are perfect for parties. You can assemble the sticks completely—rolling the ham and cheese in the dough—and place them on your parchment-lined baking sheet. Cover them tightly with plastic wrap and refrigerate for up to 24 hours. When you’re ready to bake, just pull them out, whip up the fresh glaze, brush it on, and bake as directed. They may need an extra minute or two in the oven since they’ll be starting from cold.
How do I store and reheat leftovers?
If you’re lucky enough to have leftovers, they store quite well. Let them cool completely, then place them in an airtight container in the refrigerator for up to 3 days. The microwave will make them soft, so for the best results, I recommend reheating them in an oven or toaster oven at 350°F for about 5-7 minutes, or until they are warmed through and the dough has crisped up again. An air fryer also works wonders for bringing back that fresh-baked texture!
What are the best dipping sauces to serve with these?
While they are incredibly flavorful on their own, a good dipping sauce can take them to the next level! A simple marinara sauce is a classic choice. For a tangy and sweet option, honey mustard is fantastic. A good ranch dressing is always a crowd-pleaser, especially for kids. For something a little different, try a spicy brown mustard or even a cheese sauce for an extra dose of cheesy goodness.
Conclusion
There’s a special kind of joy in pulling a tray of these golden, bubbly Ham and Cheese Sticks from the oven. The aroma fills the house, and you know you’ve created something effortlessly delicious that everyone will love. It’s more than just a recipe; it’s a solution for busy weeknights, a centerpiece for casual get-togethers, and a way to make memories in the kitchen. They are proof that you don’t need complicated ingredients or hours of work to make incredible **Yummy Homemade Snacks**. Whether you need **Snack Ideas For School Party** events or a comforting bite just for yourself, I hope you’ll give this recipe a try. It’s a keeper, and I have a feeling it will become a favorite in your home, just as it is in mine.
Easy Ham and Cheese Sticks
Ingredients
Equipment
Method
- Get Ready: First things first, preheat your oven to 350°F (175°C). This is a crucial step to ensure they bake evenly. Go ahead and line a large baking sheet with parchment paper. This not only prevents sticking but makes cleanup a breeze.
- Prep the Dough: Carefully unroll your two crescent dough sheets on a clean, lightly floured surface. Using a pizza cutter or a sharp knife, cut each sheet into four equal rectangular pieces. You’ll end up with eight pieces total, ready for their delicious fillings.
- Assemble the Sticks: Now for the fun part! Lay out the ham evenly across your eight dough rectangles. Don’t be shy with it! Place one cheddar cheese stick on the edge of each piece, right on top of the ham. Gently fold in the short ends of the dough over the cheese stick, then roll it all up snugly like a little sleeping bag. This helps keep all that cheesy goodness from escaping.
- Arrange for Baking: Place each rolled-up stick on your prepared baking sheet, leaving a little space between them so they can bake up golden and beautiful without sticking together.
- Mix the Magic Glaze: In a small bowl, whisk together the melted butter, Worcestershire sauce, Dijon mustard, dried minced onion, and poppy seeds. The smell alone will tell you you’re on the right track! This mixture is what takes these from good to absolutely amazing.
- Brush with Flavor: Using a pastry brush, generously coat the top and sides of each ham and cheese stick with the butter mixture. Make sure to get it into all the little crevices. This glaze creates the perfect savory, golden-brown crust.
- Bake to Perfection: Slide the baking sheet into your preheated oven. Bake for 12 to 15 minutes. You’re looking for a beautiful, deep golden-brown color and maybe a little bit of bubbly cheese peeking out.
- Serve and Enjoy: The hardest part! Let them cool for just a minute or two before serving. These are best enjoyed hot and fresh, when the cheese is perfectly gooey. They are truly one of the best Hearty Snacks For A Crowd.